Google is on a roll with Google Chrome updates. The company has promised to deliver Chrome updates every 15 days. Google automatically updates the browser in the background to keep you in sync with the latest and greatest from the company. However, this behavior may annoy some users. If you are among them, read along to the four best ways to stop automatic Google Chrome updates on Windows 10 and Mac.

Being on the latest Google Chrome browser is essential for security. But on the flip side, Google might remove some functions in the new build or change positions of some menus that might not go well with your preference.
In such cases, you should stop automatic Chrome updates on Windows and Mac. Here’s how to do it.
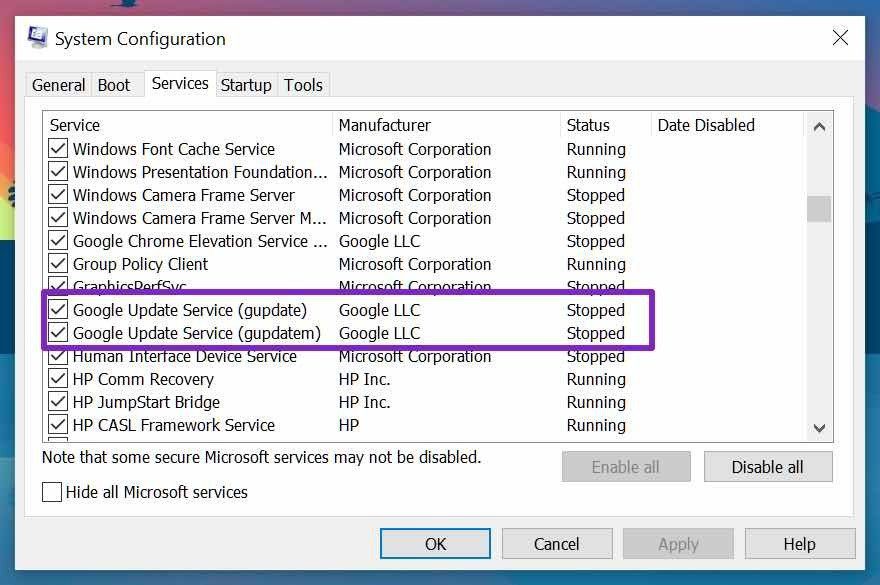
1. Disable Automatic Chrome Update from Windows System Configuration (Windows)
Using the System Configuration menu on Windows, one can easily disable automatic Chrome updates on Windows.
Step 1: Hit the Windows + R keys and open the Run menu.
Step 2: Type msconfig and hit Enter key to open the System Configuration menu.

Step 3: Go to the Services tab.
Step 4: Scroll down and uncheck both the Google Update Service dialog box.
Open Google Chrome and go to the About Chrome menu. You will see an error indicating Chrome’s failure to check new updates.
2. Use Windows Services Manager
Windows service manager offers a peek into every background service available on your Windows PC. Using the same menu, one can disable/enable Chrome automatic updates on the device.
Go through the steps below to make the necessary changes.
Step 1: Press Windows + R keys and open the Windows Run menu.
Step 2: Type service.msc and hit the Enter key.
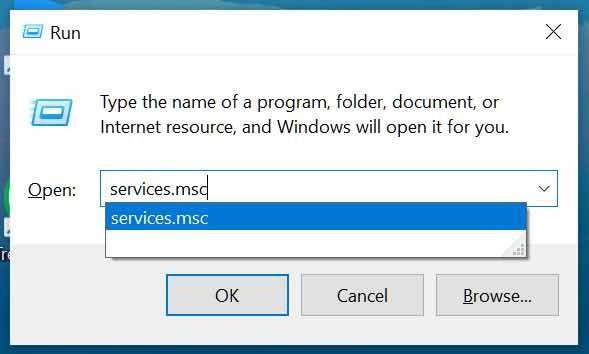
Step 3: It will open the Services menu on your PC.
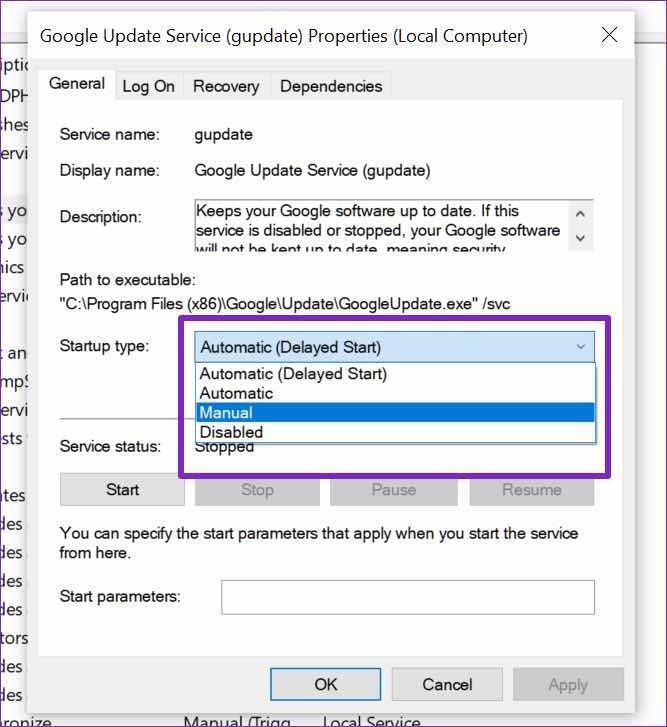
Step 4: Look for Google Update (gupdate) and Google Update (gupdatem) on the list.

Step 5: Double-click on it, and it will open the Properties menu.
Step 6: Go to the General tab.
Step 7: Click on the Startup type and select Disabled from the following menu.
Hit Ok at the bottom and restart your PC to implement the changes.
3. Change Chrome Auto Update URL (Mac)
Mac users, this one is for you. The steps on the Mac are different compared to the Windows. Let’s go through them.
Step 1: Open the Finder menu on Mac.
Step 2: Go to the Application folder.
Step 3: Find the Google Chrome app and right-click on it.
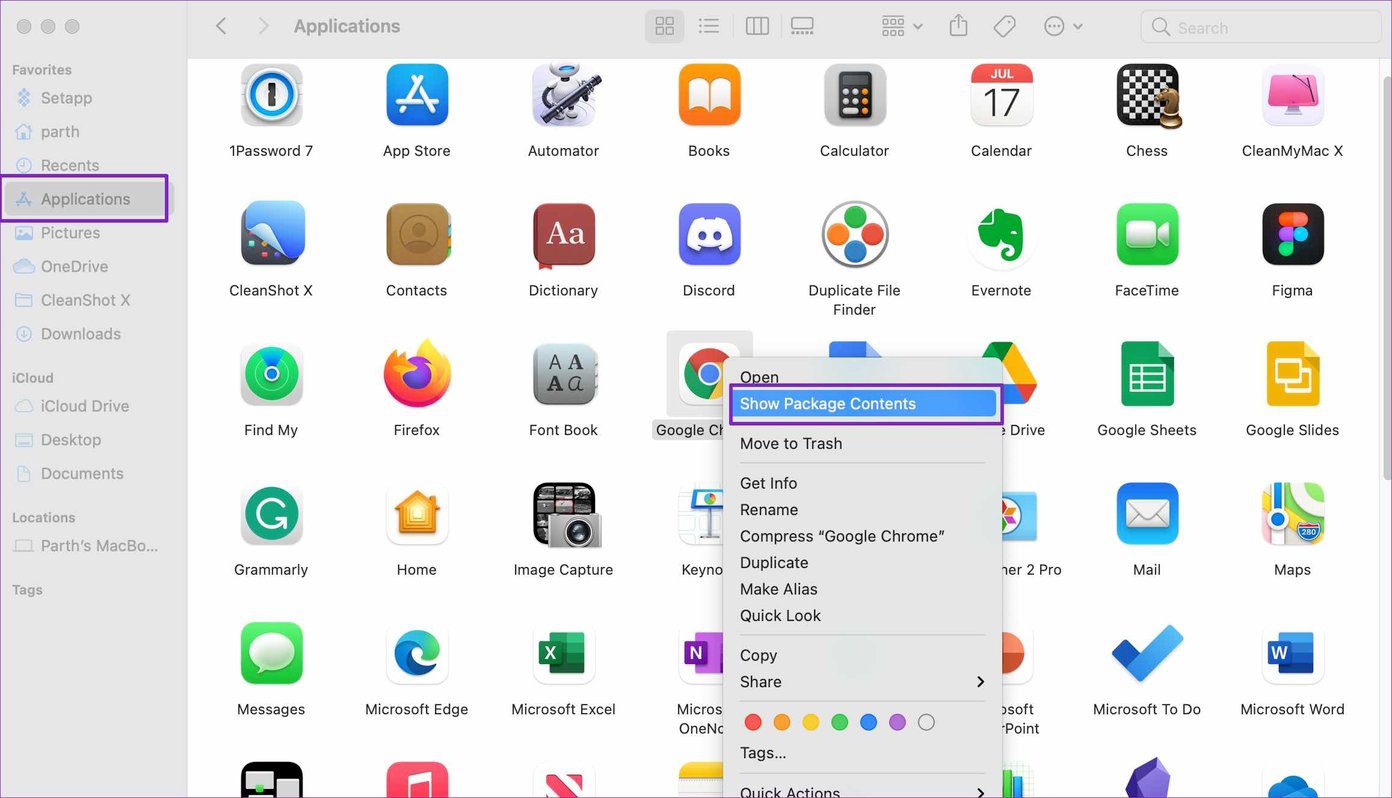
Step 4: Select Show Packaged Content and open the Contents folder.
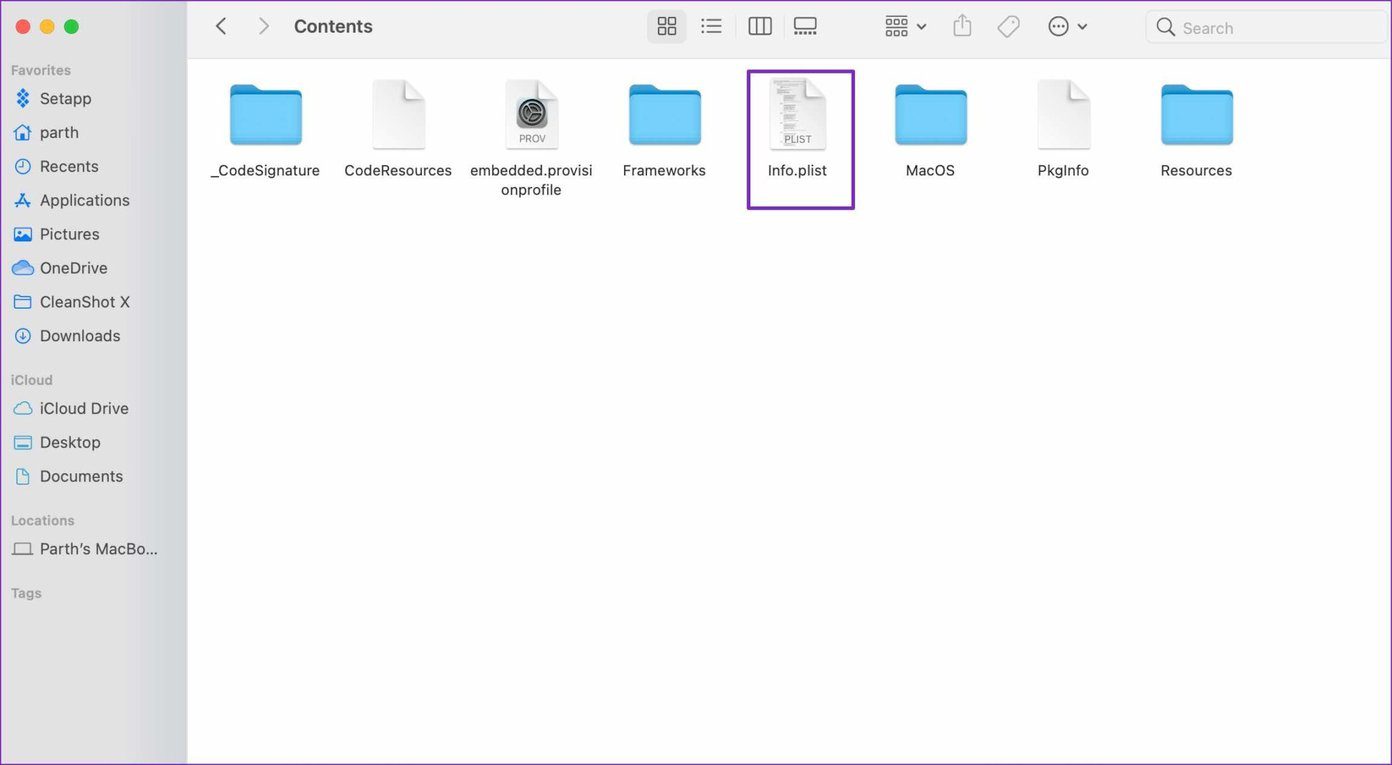
Step 5: Open info.plist file. Remember you need to have editors like Xcode to open a plist file. Also, you should have write permission for both the Contents folder and the Info.plist file to edit.
Step 6: Check for KSUpdateURL and rename the string value URL to something else.
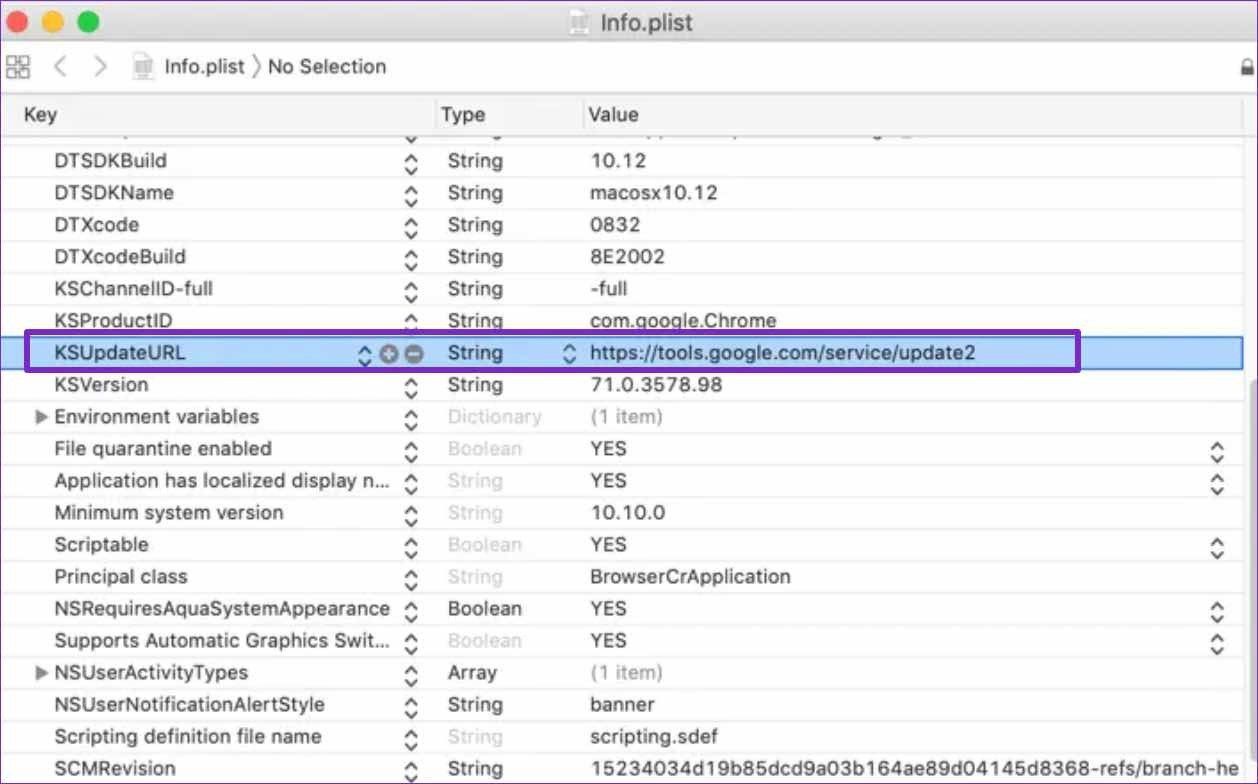
Close the current window and you are good to go without Chrome auto-updates on Mac.
4. Rename Google Chrome Update Folder (Mac)
Google Chrome creates an update folder on the device to run the auto-update process in the background. You can rename that folder to something else to stop the auto-update process.
Go through the steps below.
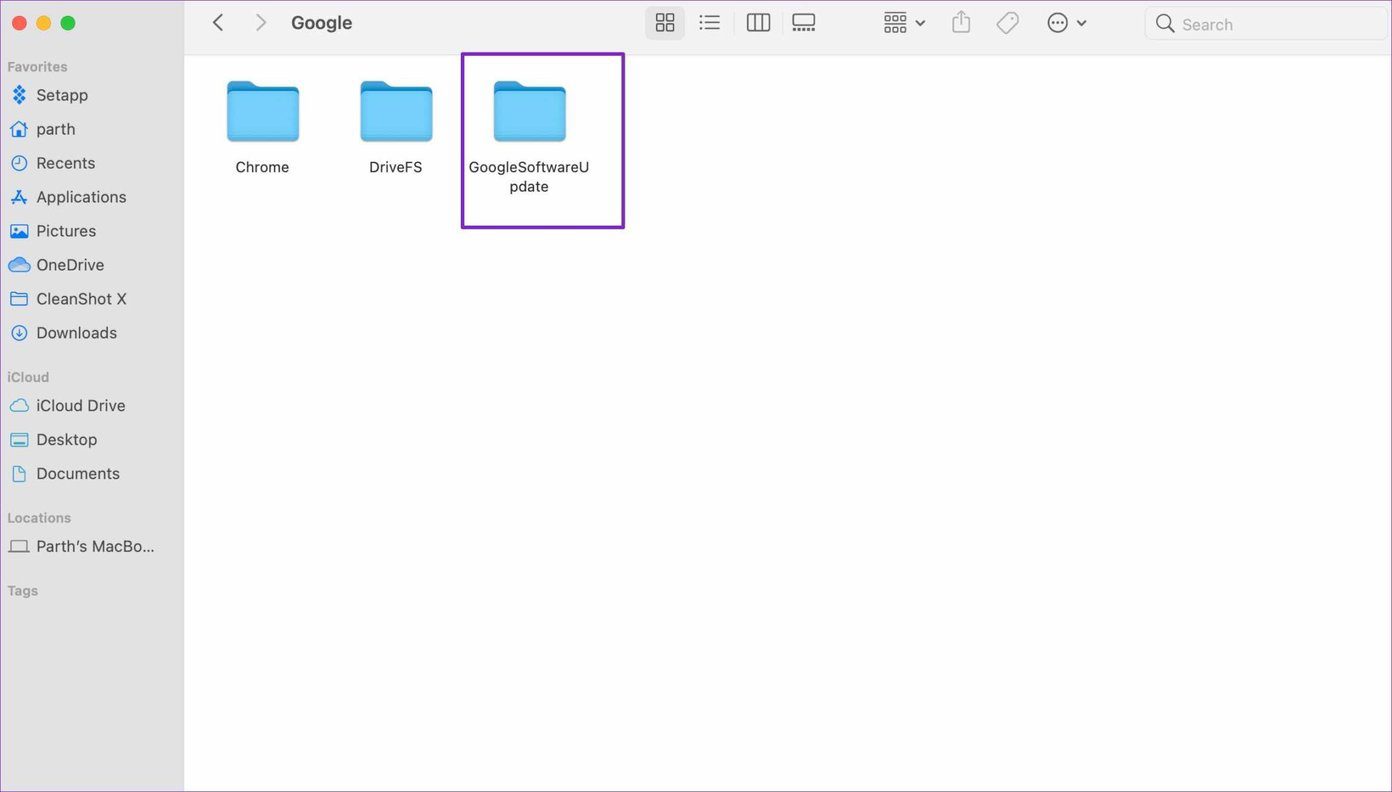
Step 1: Open the Finder menu on Mac.
Step 2: Go to your Mac drive.
Step 3: Navigate to Library > Google folder.
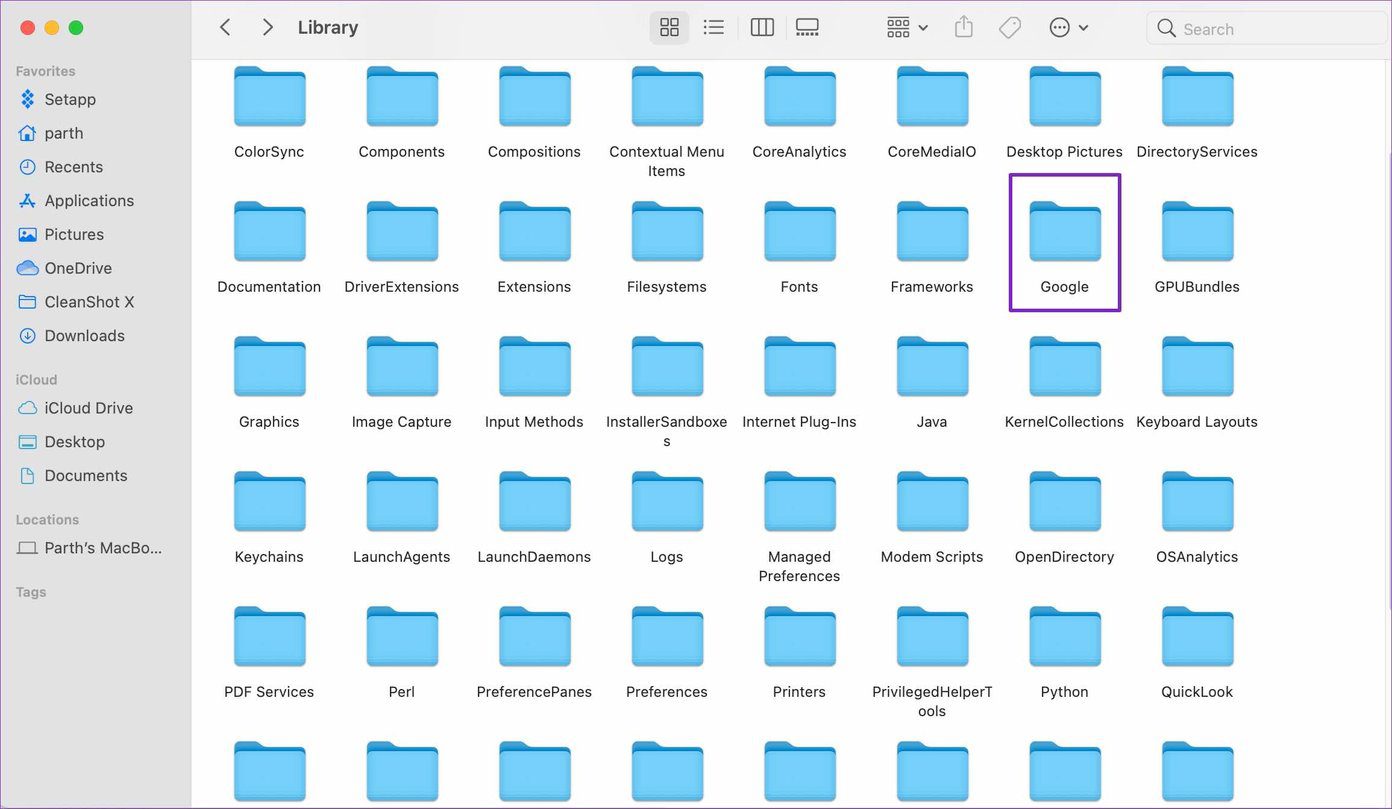
Step 4: You will find GoogleSoftwareUpdate inside it.
Rename the folder to something else, and it should disable Chrome auto-update on Mac.
Sometimes, when you manually try to update Google Chrome, the browser creates this folder again in the Library menu. In such cases, the auto-update will enable itself again.
One can also block Chrome update URLs on Windows and Mac. But there is a problem with the method. If Google decides to use a different URL to update the browser, you will see auto-update kicking in the background.
Should You Disable Google Chrome Auto-Update
There is a reason why Google continuously releases new updates to the Chrome browser every 15 days. And no, it’s not about making the Chrome browser more power-hungry with each update.
With attackers, spammers, and vulnerability, it’s important than ever to secure your browsing experience with the latest protocols from Google.
If you have disabled Google Chrome auto-update, you might leave a huge security hole with an old Chrome version on your Windows or Mac.
Stop Automatic Google Chrome Updates
In some cases, Google Chrome auto-updates can be irritating. For example, it might remove your favorite feature or mess up the navigation with new UX. So here’s what we would recommend – you can disable Chrome auto-updates using the methods above. Whenever a new Chrome version launches, check what’s new in it and if it’s necessary for you, you can update the Google Chrome browser manually.
Next up: Is your Google Chrome search engine changing to Bing from Google? Read the post below to learn how to fix the issue.
Last updated on 07 February, 2022
The above article may contain affiliate links which help support Guiding Tech. However, it does not affect our editorial integrity. The content remains unbiased and authentic.
Read Next
 5 Ways to Turn off Automatic Updates on Windows 11
You would want to stop automatic updates on Windows for many reasons.
5 Ways to Turn off Automatic Updates on Windows 11
You would want to stop automatic updates on Windows for many reasons.
 3 Best Ways to Turn Off Automatic Driver Updates on Windows 11
Have you ever experienced your Windows PC restart randomly and give you the notification that Windows has automatically updated your device drivers?
3 Best Ways to Turn Off Automatic Driver Updates on Windows 11
Have you ever experienced your Windows PC restart randomly and give you the notification that Windows has automatically updated your device drivers?
 A Guide to Disabling Automatic Windows 10 Updates
Windows 10 completes five years in the market this year.
A Guide to Disabling Automatic Windows 10 Updates
Windows 10 completes five years in the market this year.
 How to Disable Automatic Updates in Firefox
Firefox version 12 rolled out with the long-awaited feature of silent automatic update making the future updates easier.
How to Disable Automatic Updates in Firefox
Firefox version 12 rolled out with the long-awaited feature of silent automatic update making the future updates easier.
 How to Disable Automatic App Updates on Android and iOS
Automatic app updates ensure that your favorite apps are always updated and bug-free.
How to Disable Automatic App Updates on Android and iOS
Automatic app updates ensure that your favorite apps are always updated and bug-free.
 How to Stop Apple Music Automatic Downloads on iPhone and Mac
Apple Music allows you to download tracks or entire albums for offline listening on the iPhone, Mac, and PC.
How to Stop Apple Music Automatic Downloads on iPhone and Mac
Apple Music allows you to download tracks or entire albums for offline listening on the iPhone, Mac, and PC.
 How to Stop Automatic Backup to Google Photos
Google Photos is a reliable cloud storage solution to save your memories and access them on different devices using your Google account.
How to Stop Automatic Backup to Google Photos
Google Photos is a reliable cloud storage solution to save your memories and access them on different devices using your Google account.
 Top 3 Ways to Stop Google Chrome From Opening at Startup on Mac
Google Chrome has a lead over rival browsers for Mac and Windows.
Top 3 Ways to Stop Google Chrome From Opening at Startup on Mac
Google Chrome has a lead over rival browsers for Mac and Windows.
DID YOU KNOW
Google plans to roll-out ARCore to around 100-million Android devices.