Seamless backup/restore is one of the best features of the iPhone over the Android ecosystem. Google has been trying to offer a capable backup/restore solution over Android, but so far, their attempt has been half-baked compared to Apple. On iPhone, you can back up everything from messages, contacts, call logs, app data, photos, videos, Apple Mail accounts, and more. In short, almost all the customizations made and data you’ve added. The system also allows you to select the data that you want to backup.

You may have heard people praising the hassle-free iPhone setup from scratch. iPhone’s native backup feature plays a major role in it.
In this post, we will cover everything about iPhone backup. How to perform a full backup, selective backup, customize default settings, which app usually takes more space, how to backup using PC or Mac, and more. Let’s get started.
What Are the Default Settings For iPhone Backup
By default, Apple uses its iCloud platform to backup iPhone data. iCloud only offers 5GB of free storage out of the box. iPhone’s default settings will fill up space in no time. You might want to consider paying for the iCloud premium plans, which start at $1 for 50GB per month. (Don’t worry, we will also cover how to backup only essential iPhone data using iCloud and that too within 5GB space so that you don’t need to pay for iCloud storage).
Out of the box, Apple takes a backup of all the photos and videos to the iCloud platform. iOS also backs up all the default Apple apps to iCloud. All your third-party apps data also get backed up. The whole practice makes the restore experience smoother than ever. You don’t even have to sign-in again to use third-party apps. Users can see the ongoing progress from the iPhone Settings app > Profile > iCloud. It also backs up the third-party apps. You will see them on the same menu.
Follow the steps below to see the detailed breakdown of iCloud storage space.
Step 1: Open the Settings app on the iPhone.
Step 2: Navigate to the Account Information > iCloud > Manage Storage.
Step 3: Here, you will see a detailed breakdown of iCloud storage.


From the iCloud menu, you will see the iCloud backup option, which kicks in whenever your iPhone gets connected to the Wi-Fi.
How to Perform Selective iPhone Backup
You can exclude some of the data from the iCloud backup to reduce the backup size. Two major options are contributing to the large size of iPhone backup – Media and WhatsApp.
If you are already using other cloud storage solutions such as Google Photos or OneDrive for photos and video backup, you can turn off iCloud photo backup to save space on the iCloud. WhatsApp is another app that can take a huge amount of space in iCloud and the iPhone backup file. If you don’t need your WhatsApp chats on the new phone, you can disable WhatsApp backup from the Settings.
Follow the steps below to turn off photos’ backup and WhatsApp backup on iPhone.
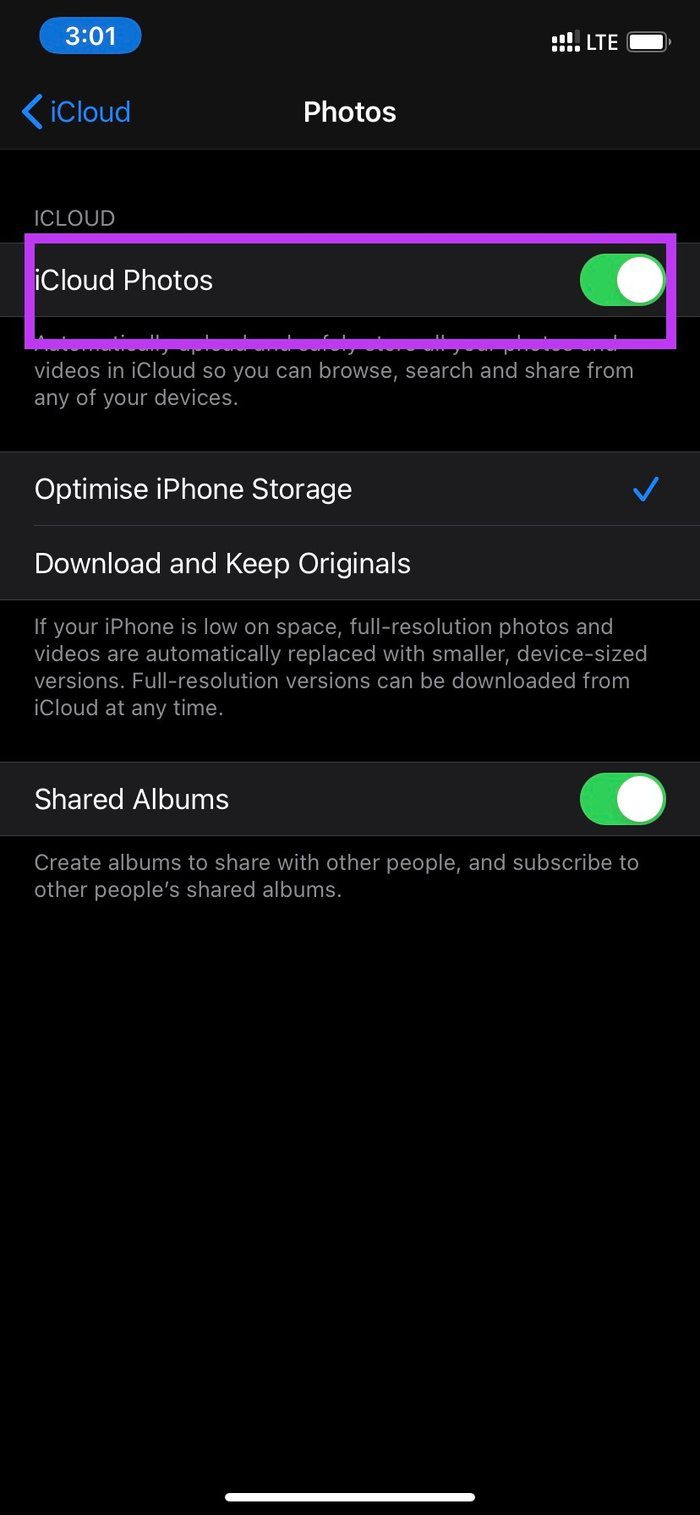
Step 1: Open the Settings app on the iPhone.
Step 2: Go to Profile > iCloud > Photos, and turn off the iCloud Photos option.

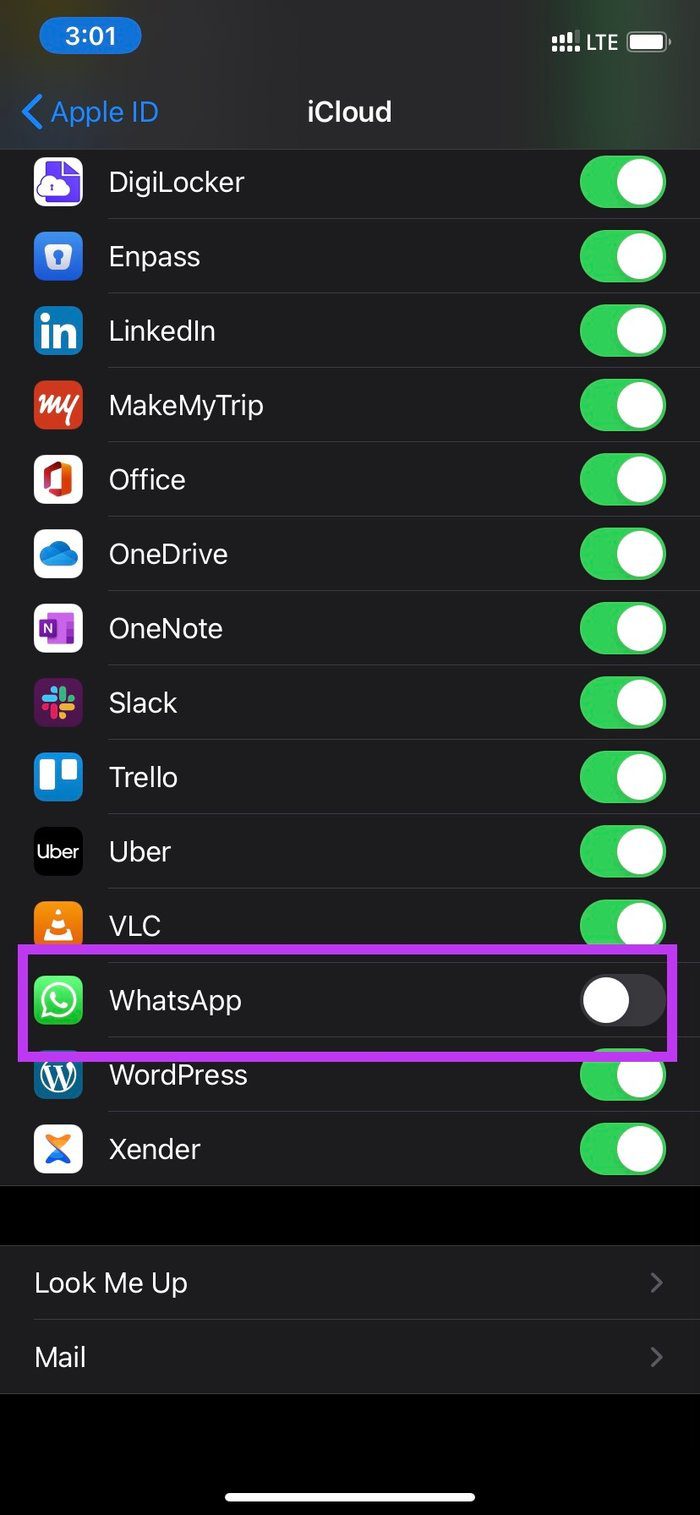
Step 3: Go back to the iCloud menu and scroll down to the apps list.
Step 4: You will find WhatsApp in the list, toggle off the app backup option.
You can also selectively disable other apps from iCloud backup. Apple displays the last backup, current backup size, next backup size, and allows you to disable apps from the backup. The option is buried inside the iPhone Settings menu. Go through the steps below to open iPhone info and access such information.
Step 1: Open the Settings app on the iPhone.
Step 2: Navigate to Profile > iCloud > Manage Storage.
Step 3: Scroll down to Backups > Select your device.
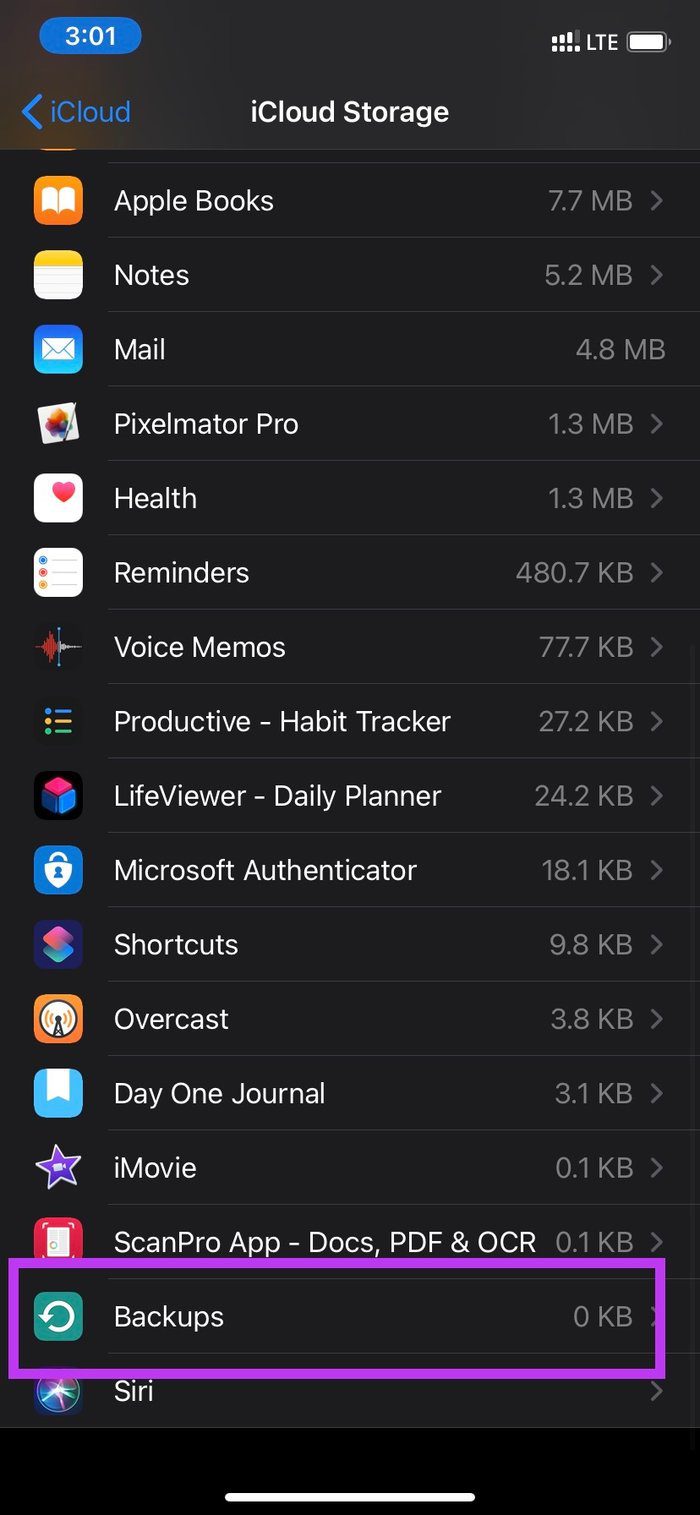
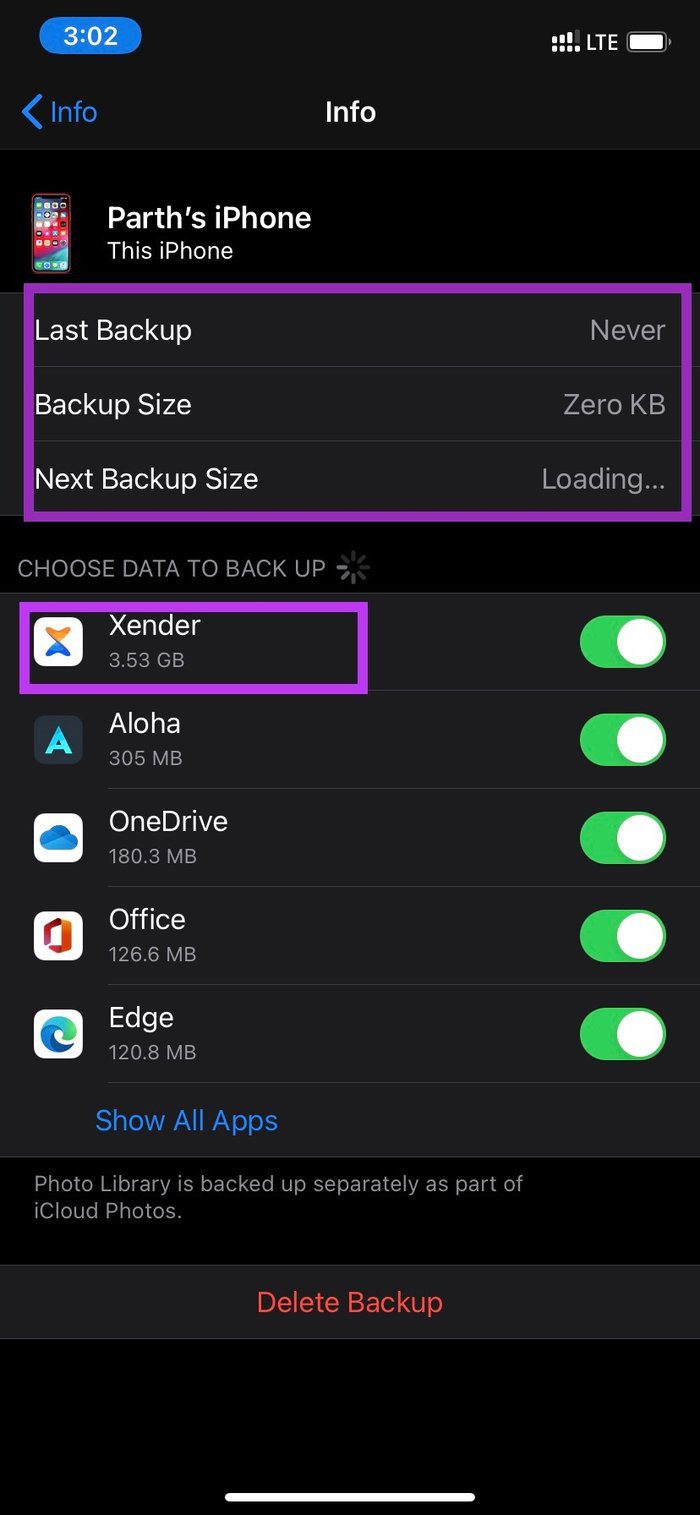
Step 4: The following menu will display the relevant information. You can disable the irrelevant apps from the iPhone backup.
For example, in my case, I disabled the Xender app backup as I no longer needed the app. I saved a cool 3.5 GB of data by toggling off the option. From the same menu, you can delete the last backup file as well.
How to Perform iPhone Backup Using PC or Mac
Not everyone is comfortable with performing iPhone backup using the iCloud platform. The solution requires a constant internet connection, and it may force you to buy iCloud storage, which is not feasible for everyone. In such cases, you can always perform iPhone backup using Mac or iTunes on PC.
Step 1: Connect your iPhone to PC or Mac using the data cable.
Step 2: Open the device location and navigate to Backups.
Step 3: Select Back up all of the data on your iPhone to this PC/Mac option.

The option will create an encrypted backup file on the PC with password protection and sensitive personal data.
Why You Should Take iPhone Backup Often
It can be swift and easy for users to set up a new iPhone from scratch. During the iOS upgrade process, if you face any issue, you can always return data from the iCloud backup or the backup file from the PC or Mac.
If you are using public beta or developer beta version of iOS and took the full backup of it using PC or Mac then you can’t restore the same backup file while downgrading the iOS version. The process may result in compatibility issues.
Take Regular iPhone Backups
It’s always advisable to take iPhone backup at regular intervals. You can exclude photos and other data-hungry apps from the backup. If you don’t prefer iCloud then you can always use the desktop to create a backup file.
Next up: iOS offers Screen Time option to keep an eye on your device usage. You can always use Screen Time Passcode to remove such a limit. Read the post below to learn more about Screen Time Passcode on iPhone.
Last updated on 02 February, 2022
The above article may contain affiliate links which help support Guiding Tech. However, it does not affect our editorial integrity. The content remains unbiased and authentic.
Read Next
 The Complete Firefox Backup Guide
Recently we learnt a few things about Firefox about:config preferences and tried to take note of the basic ones.
The Complete Firefox Backup Guide
Recently we learnt a few things about Firefox about:config preferences and tried to take note of the basic ones.
 Complete Android Backup and Restore: The Only Guide You Need
Gone are the days when switching to a new phone meant only to backup the contacts on the SIM card.
Complete Android Backup and Restore: The Only Guide You Need
Gone are the days when switching to a new phone meant only to backup the contacts on the SIM card.
 Google Photos on iPhone Not Taking a Backup? Try These Fixes
Google Photos is one of the most exciting products from Google, and not just due to the significantly larger baseline of free storage that you get compared to iCloud.
Google Photos on iPhone Not Taking a Backup? Try These Fixes
Google Photos is one of the most exciting products from Google, and not just due to the significantly larger baseline of free storage that you get compared to iCloud.
 Why Is iCloud Backup Taking So Long
Apple iCloud service is a vital part of the Apple ecosystem.
Why Is iCloud Backup Taking So Long
Apple iCloud service is a vital part of the Apple ecosystem.
 A Guide to Using Flash Correctly While Taking Photos
More photographs are now being taken in the history of human kind than ever before with our handy lil’ smartphones.
A Guide to Using Flash Correctly While Taking Photos
More photographs are now being taken in the history of human kind than ever before with our handy lil’ smartphones.
 A Complete Guide to Fixing Instagram Not Working on iPhone
Instagram is currently everyone's escape from the grim situation while sitting at home or elsewhere.
A Complete Guide to Fixing Instagram Not Working on iPhone
Instagram is currently everyone's escape from the grim situation while sitting at home or elsewhere.
 A Complete Guide to Fixing iPhone Not Connecting to Wi-Fi
Every iPhone user must've faced a network glitch at least once.
A Complete Guide to Fixing iPhone Not Connecting to Wi-Fi
Every iPhone user must've faced a network glitch at least once.
DID YOU KNOW
The Apple A12 Bionic is the world’s first commercially available 7nm chipset.