If you’re looking to sell or give away your Mac, it’s important to ensure that all your data and files are securely erased from the device. One of the easiest and most effective ways to do this is by performing a factory reset, which wipes the entire hard drive clean and restores the Mac to its original, out-of-the-box state.

And not just for letting go, but the process also helps optimize the performance of the device, making it run like new. While performing a factory reset on a Mac may sound like a daunting task, it’s quite straightforward and can be completed in a few simple steps. The process is essentially the same whether you’re using a MacBook Pro or Air, iMac, or Mac mini.
Things to Do Before You Reset Your Mac
Wiping your Mac ideally removes all saved settings, log-in IDs, apps, and passwords. However, it’s safer and wiser to remove all traces of yourself from the Mac manually. And while it’s a few extra steps, we suggest doing it, especially if you’re selling or passing on your Mac.
- Backup your data: Well, it’s a given. Before you restore a Mac to its factory settings, creating a secure Mac backup is almost a necessity.
- Sign out of accounts: Although not all apps, start with signing out of Apple ID and the default apps like Messages, FaceTime, etc.

- Cancel or transfer AppleCare: If your Mac is still under AppleCare coverage, you’ll need to transfer or cancel the plan.
- Deauthorize the device: If you’re passing on or reselling the Mac, it is advised to remove it from associated devices. You can deauthorize the Mac from the Apple Music app.

- Disconnect paired devices: This is to ensure that your device doesn’t pair back to the erased Mac when it restarts. So, whether your iPhone or Bluetooth devices, unpair them from your Mac to safeguard your sensitive information.
Method 1: Erase All Content and Settings to Reset Mac to Factory Settings
Note: This feature only works for Macs with Apple silicon or the Apple T2 Security Chip, running on macOS Monterey or later.
Quite like the iPhone, the latest Macs also boast an Erase All Content and Settings feature. This feature makes factory resetting MacBook Air or Pro a breeze. It quickly and securely erases all settings, data, and apps stored on the device while maintaining the currently installed OS.
On macOS Ventura
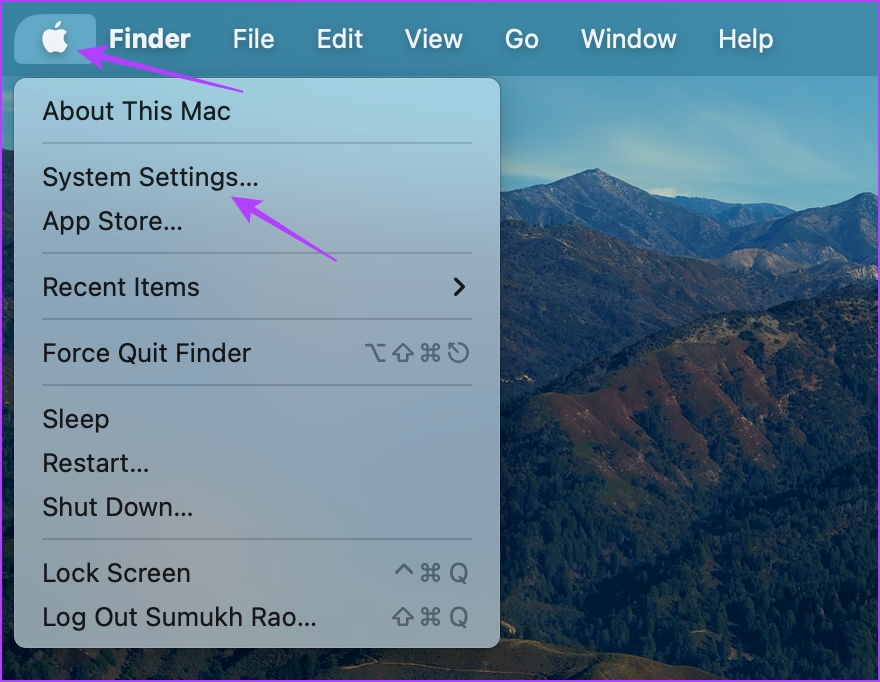
Step 1: Click on the Apple Menu from the top-left corner of the screen.
Step 2: Select System Settings.
Step 3: Click General from the Side Bar.
Step 4: Next, click Transfer or Reset from the options.

Step 5: Select ‘Erase All Content and Settings’.

Step 6: Enter your device password.
Step 7: Click Continue and follow the on-screen instructions.
Note: Once you click Continue, all opened apps will instantly be closed. So, open the article on a different device or print it for safekeeping.
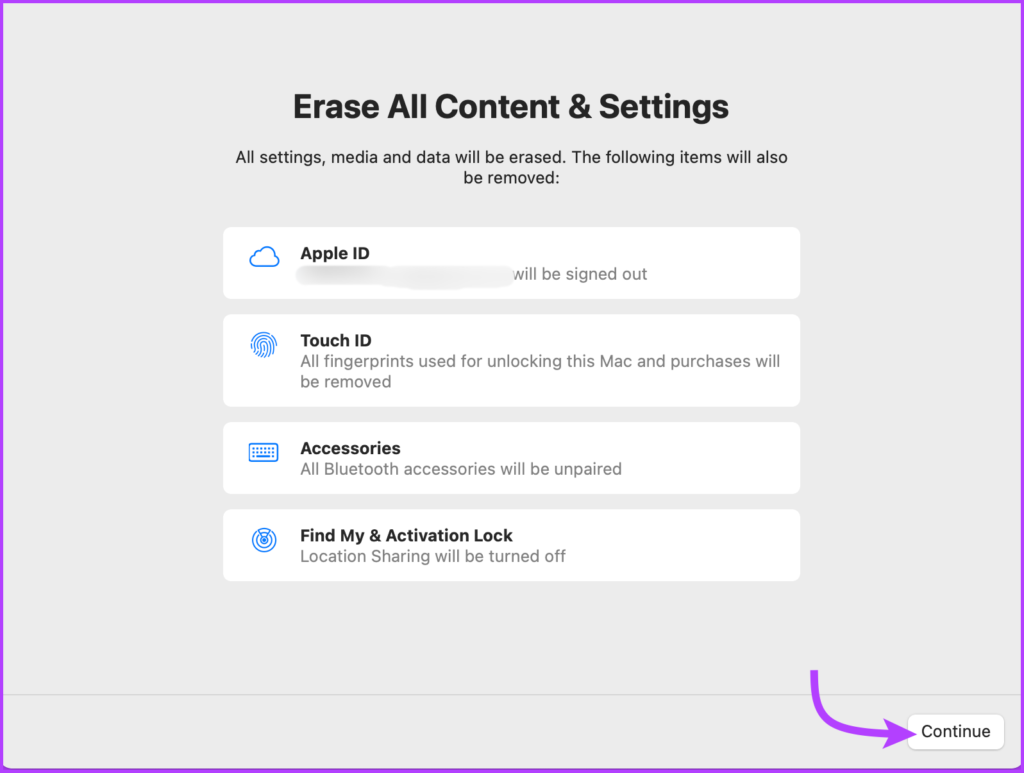
Step 8: Enter your Apple ID password to sign out and click Continue again.
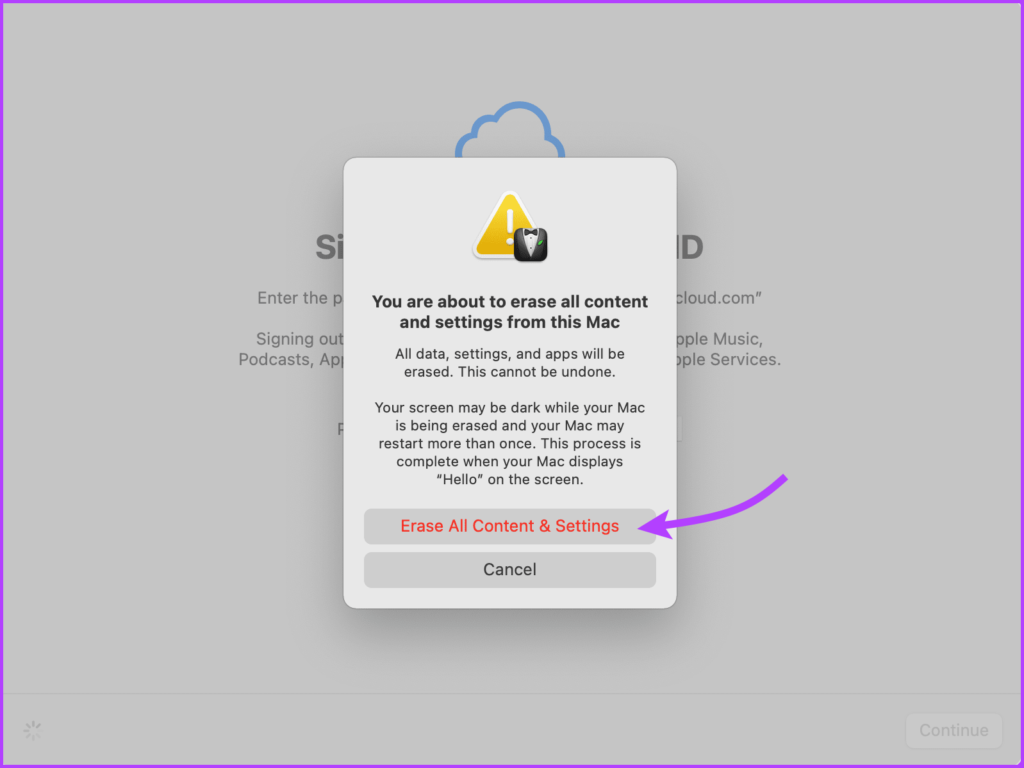
Step 9: Here, click ‘Erase All Content & Settings’ to confirm that you want to proceed.
On macOS Monterey
Go to Apple Menu → System Preferences → from the menu bar, select ‘Erase All Content and Settings’ and follow the steps mentioned above.
After this, the Mac will restart and show a black screen or progress bar. If prompted, connect the device to Wi-Fi or any necessary Bluetooth accessory (keyboard or mouse).
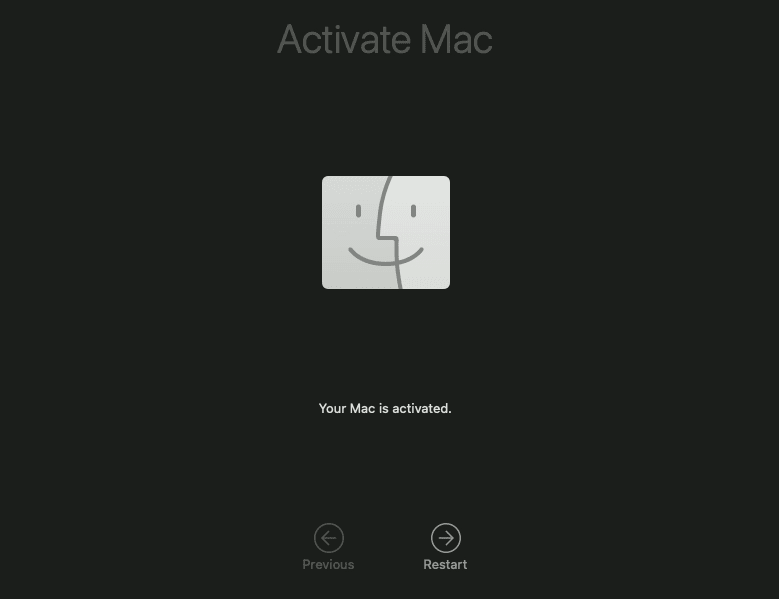
Once done, the Mac will activate. Now, click Restart. You’ll be directed to the setup assistant, where you can either reset the Mac as fresh (if there was an issue with it) or press and hold the power button on your Mac until it turns off.
Method 2: How to Factory Reset M1 or Intel MacBook With Disk Utility
If you’re using a Mac with an Intel chip on any macOS or M1 chip with macOS Big Sur or older, Apple’s built-in startup disk can help you wipe a MacBook.
For this, you’ll first have to enter the macOS recovery mode the rest of the process remains the same. So, we have divided the steps into two parts – entering the Recovery mode followed by completely resetting your Macbook. Follow along.
1. Enter the macOS Recovery Mode
The method to enter the recovery mode differs for Apple Silicon and Intel chip-powered Macs. While we have highlighted the procedure for both in the next two sections, follow the relevant to your device.
On Mac With Apple Silicon Chip
Shut down your Mac. Now, press and hold the power button until the startup options window appears. Select Options and then click Continue.

Enter the Administrator or user password followed by the Apple ID and password. Now, from the utility window, select Disk Utility and click Continue.

On Intel-Based Mac
Turn on your Mac while pressing and holding the Command (⌘) + R keys until you see the Apple logo. If prompted, enter your administrator password. Now in the utility window, select Disk Utility and click Continue. Now, follow the below steps.
2. Wipe Your Mac Running M1 or Intel Chip
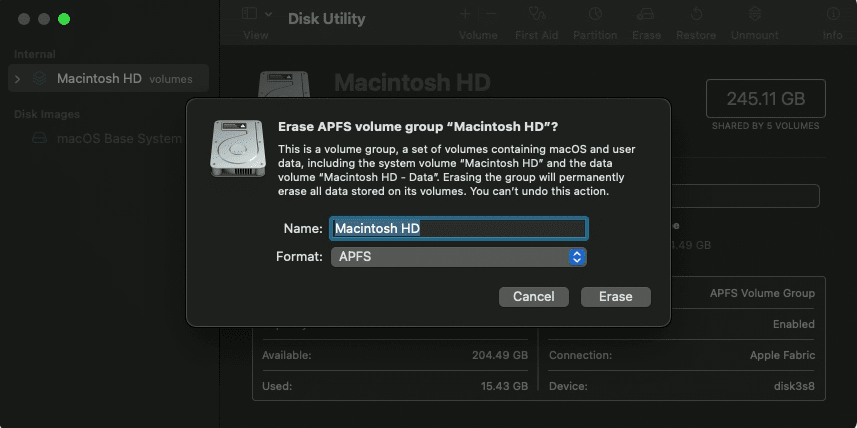
Step 1: From the Disk Utility window, here select Macintosh HD from the sidebar.
Note: If you’ve partitioned your Mac and created volumes, select these internal volumes individually, click the delete volume (–), and finally select Macintosh HD.
Step 2: Click the Erase button and then specify the name and format of the disk:
- Name: Macintosh HD
- Format: APFS
Step 3: Next click Erase or Erase Volume Group button (depending on what you see).
Step 4: Enter your Apple ID, if prompted.
Step 5: Finally, click ‘Erase Mac and Restart’.
Step 6: Once the process is complete and your Mac restarts, follow the onscreen instructions.
Step 7: Your Mac would need an internet connection, click the Wi-Fi menu from the menu bar and connect it to the Wi-Fi.
Step 8: Once your Mac activates, click ‘Exit to Recovery Utilities’.
You can either leave the Mac as is or start it again to set it up afresh. As you’ll be directed to the utility window, click Reinstall macOS and then Continue. Next, follow the onscreen instructions to reinstall macOS.
That’s it! These were both the methods you can use to reset Mac running on macOS Venture or macOS Monterey. If you have more queries, move to the next section.
FAQs About Restoring a Mac to Factory Settings
This is probably because the feature is not available on your device (not a supportive chip or macOS). If so, you can choose the Disk Utility method to return your Mac to factory settings.
There’s a chance you might have renamed it earlier, so go for whichever disk you have available. However, if you still see nothing, shut down your Mac and then unplug all nonessential devices and try again.
The time it takes to restore a Mac to factory settings depends on several factors, including the speed of your computer and the amount of data that needs to be erased. In general, the process can take anywhere from 30 minutes to several hours.
No, you do not need any special tools or software to restore your Mac to factory settings. The process is built into macOS and can be accessed through the Settings app or the macOS Utilities screen.
Factory Reset MacBook Air or Pro
So, this is how to factory reset your MacBook. But before we conclude, here’s a subtle reminder – don’t forget to make a backup before your wipe your MacBook. And if you’re planning to resell or pass on the devices always log out of accounts and deauthorize manually.
We hope everything goes smoothly for you. If you hit a snag, feel free to fill up the comment section. We’ll be happy to help you further. You must also remove the device from Find My before selling it.
Last updated on 22 March, 2023
The above article may contain affiliate links which help support Guiding Tech. However, it does not affect our editorial integrity. The content remains unbiased and authentic.
Read Next
 Top 6 Ultrawide Monitors for the New Apple MacBook Air and MacBook Pro
The new Apple MacBook Pro and MacBook Air with Apple's silicon aim to take your productivity to the next level by promising seamless performance.
Top 6 Ultrawide Monitors for the New Apple MacBook Air and MacBook Pro
The new Apple MacBook Pro and MacBook Air with Apple's silicon aim to take your productivity to the next level by promising seamless performance.
 5 Best USB-C Monitors for M1 MacBook Air and M1 MacBook Pro
Apple's new M1 MacBook Pro and the M1 MacBook Air are efficient than previous laptops, thanks to the new Apple M1 processor.
5 Best USB-C Monitors for M1 MacBook Air and M1 MacBook Pro
Apple's new M1 MacBook Pro and the M1 MacBook Air are efficient than previous laptops, thanks to the new Apple M1 processor.
 5 Best Budget Monitors for MacBook Air and MacBook Pro
Apple MacBook Pro and MacBook Air work fine when you hook them up with a monitor.
5 Best Budget Monitors for MacBook Air and MacBook Pro
Apple MacBook Pro and MacBook Air work fine when you hook them up with a monitor.
 9 Ways to Fix Fire TV Stick Remote Won’t Pair After Factory Reset
After you reset your Fire TV Stick to fix an issue, a possible new problem might spring up — the Voice Remote doesn’t work now.
9 Ways to Fix Fire TV Stick Remote Won’t Pair After Factory Reset
After you reset your Fire TV Stick to fix an issue, a possible new problem might spring up — the Voice Remote doesn’t work now.
 5 Ways to Reset Amazon Fire TV Stick to Factory Settings
Amazon Fire TV Stick is a nifty one-stop solution to access most streaming services via a single interface.
5 Ways to Reset Amazon Fire TV Stick to Factory Settings
Amazon Fire TV Stick is a nifty one-stop solution to access most streaming services via a single interface.
 M2 Pro vs M1 Pro vs M2: Which MacBook Pro Is Right For You
To say that Apple had an eventful start to the new year would be a bit of an understatement.
M2 Pro vs M1 Pro vs M2: Which MacBook Pro Is Right For You
To say that Apple had an eventful start to the new year would be a bit of an understatement.
 How to Factory Reset an Android Phone and Tablet
Smartphones help us in nearly every aspect of our lives, but they're machines at the end of the day - and machines run into problems.
How to Factory Reset an Android Phone and Tablet
Smartphones help us in nearly every aspect of our lives, but they're machines at the end of the day - and machines run into problems.
 Reset Chrome, Firefox, Safari, Opera, IE to Factory Defaults
If too many problems are occurring in a browser, the best fix may be to just reset all the settings.
Reset Chrome, Firefox, Safari, Opera, IE to Factory Defaults
If too many problems are occurring in a browser, the best fix may be to just reset all the settings.
DID YOU KNOW
Microsoft holds over 59,000 US and international patents.
