The default page layout in Microsoft Word may not be everyone’s cup of tea. If your school or organization requires a specific page margin, orientation, or size, you can easily change the page layout in Microsoft Word. Making the same changes to every Word document may be time-consuming. Here’s how you can change the default page layout in Microsoft Word.
You can dig the Layout menu in Word and make relevant changes to the page layout. After making all the required tweaks, you’ll need to save the document as a template to use it again. In this post, we will go through all the relevant options to change the page layout and save the same as a template.
Change Page Size
Microsoft Word uses the document size and layout as A4 by default. You can change it to Letter, Tabloid, A3, A5, B4, B5, Executive, Legal, and Statement – entirely depending on the type of document you use often. Here’s how you can change it and even set a specific size as the default.
Step 1: Open any document in Microsoft Word.
Step 2: Select Layout on the menu bar.

Step 3: Expand the Size menu.

Step 4: Select one of the default sizes from the list.

Follow the steps below to set a specific size as default on Microsoft Word.
Step 1: Expand the Size menu in Layout (refer to the steps above).
Step 2: Select ‘More Paper Sizes.’

Step 3: Expand the ‘Paper Size’ menu, set height, and width, check live preview and select whether you want to apply the change to the entire document or go forward from this point.
Step 4: Select ‘Set As Default’ and hit OK.

After this, Microsoft Word will remember your choice and use the specified page layout for all your future documents.
Change Document Orientation
If you plan to create a flyer in Microsoft Word, you may want to change the document orientation from portrait to landscape.
Step 1: Open any Microsoft Word document and click Layout at the top.
Step 2: Expand ‘Orientation’ and select Landscape.

Tweak Document Margins
If you want precise control over how your Word document should look, you should tweak document margins using the steps below.
You can either select one of the preset margins or set custom margins for a Word document. Let’s check both options.
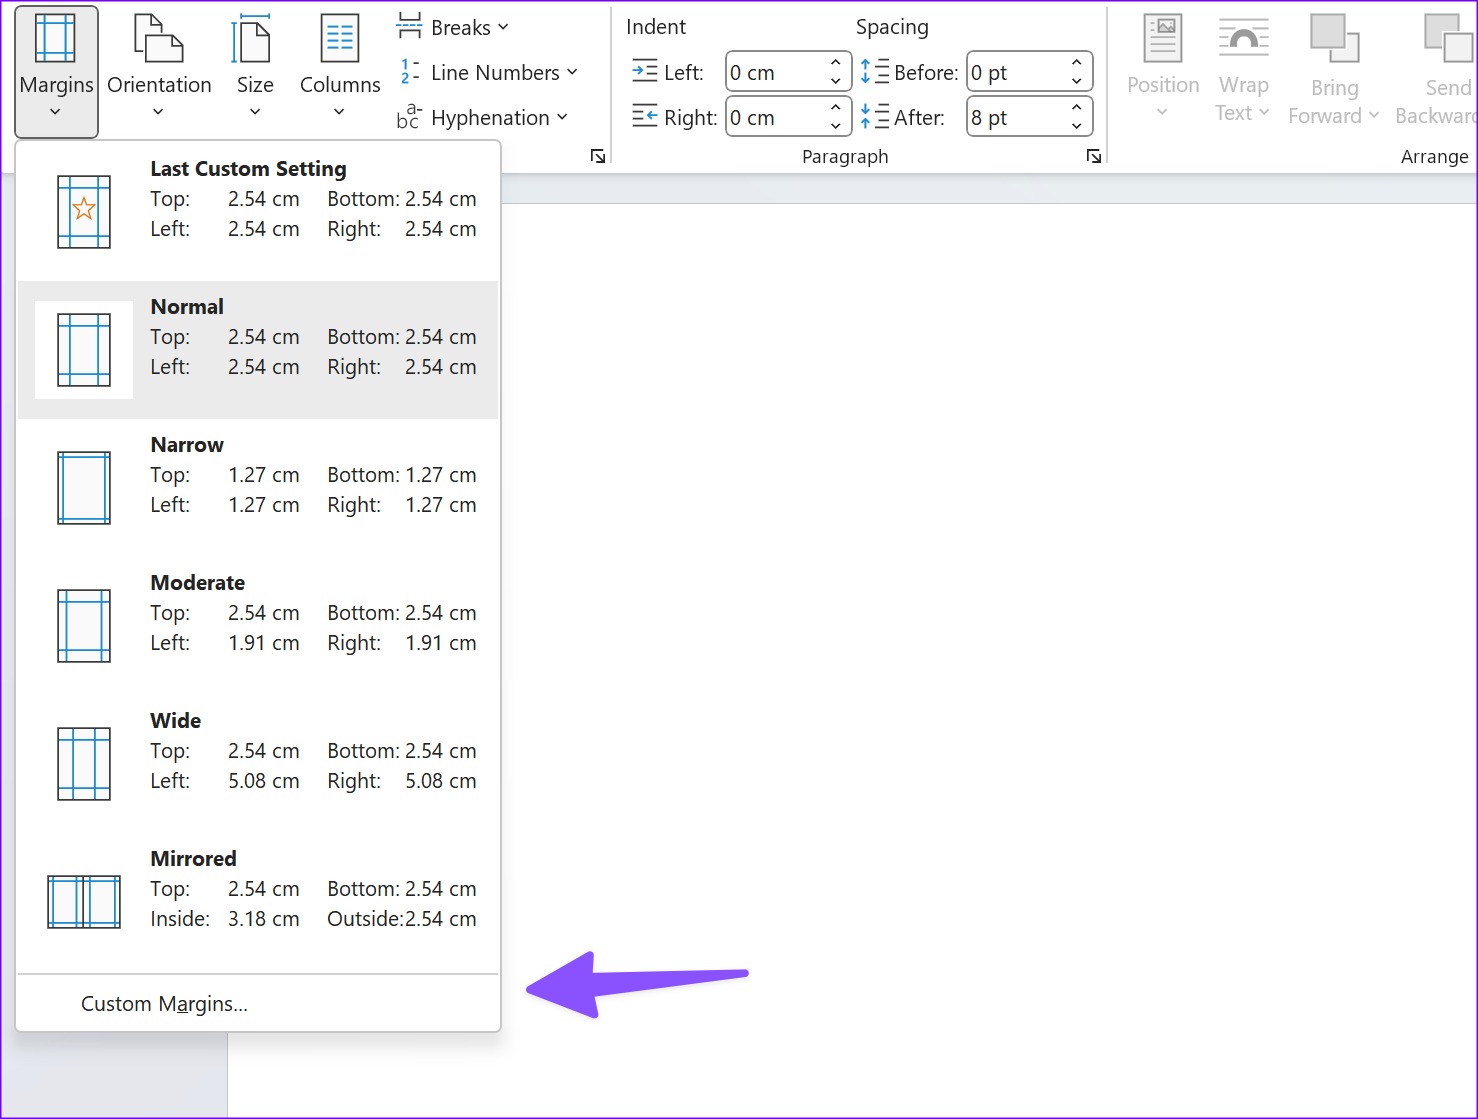
Use Preset Margins
Step 1: Open the Layout menu in Microsoft Word (check the steps above).
Step 2: Expand the Margins menu.

You have five options:
- Normal
- Narrow
- Moderate
- Wide
- Mirrored
You can check each option’s top, bottom, right, and left margins and the live preview.
Try Custom Margins
Only a few prefer the default option to change margins in a document. You can set custom margins and tweak your preference.
Step 1: Open the Margins menu in Microsoft Word (check the steps above). Click ‘Custom Margins.’.
Step 2: Set top, bottom, left, and right margins. Click Gutter position to include additional space inside the margins you’ve set.
Step 3: Check the live preview and hit OK.

Make sure to hit the ‘Set As Default’ button if you intend to use the same margins and orientation for all your documents.
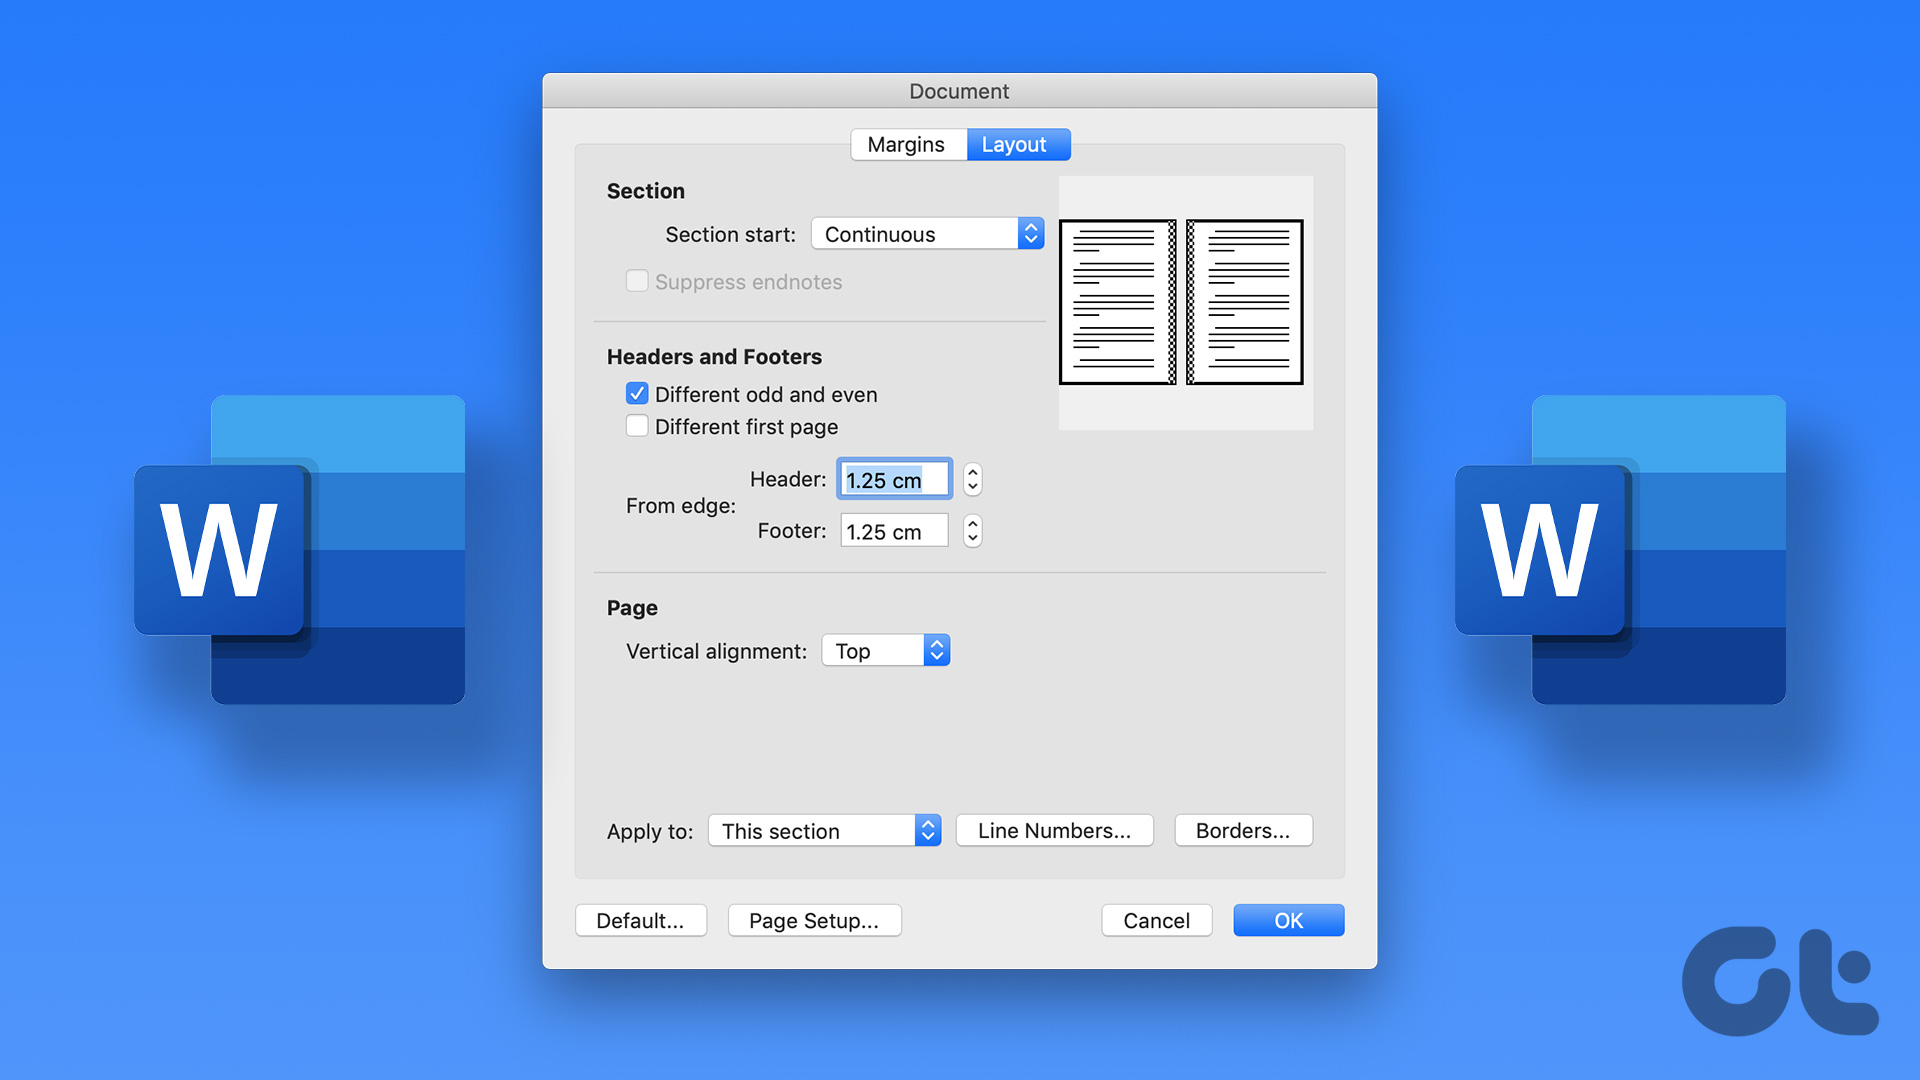
Make Layout Changes
Your ideal Word page setup is complete with layout customization. Let’s check all available options to customize it.
Step 1: Open the ‘Custom Margins’ menu in Microsoft Word (check the steps above).
Step 2: Slide to the ‘Layout’ menu.
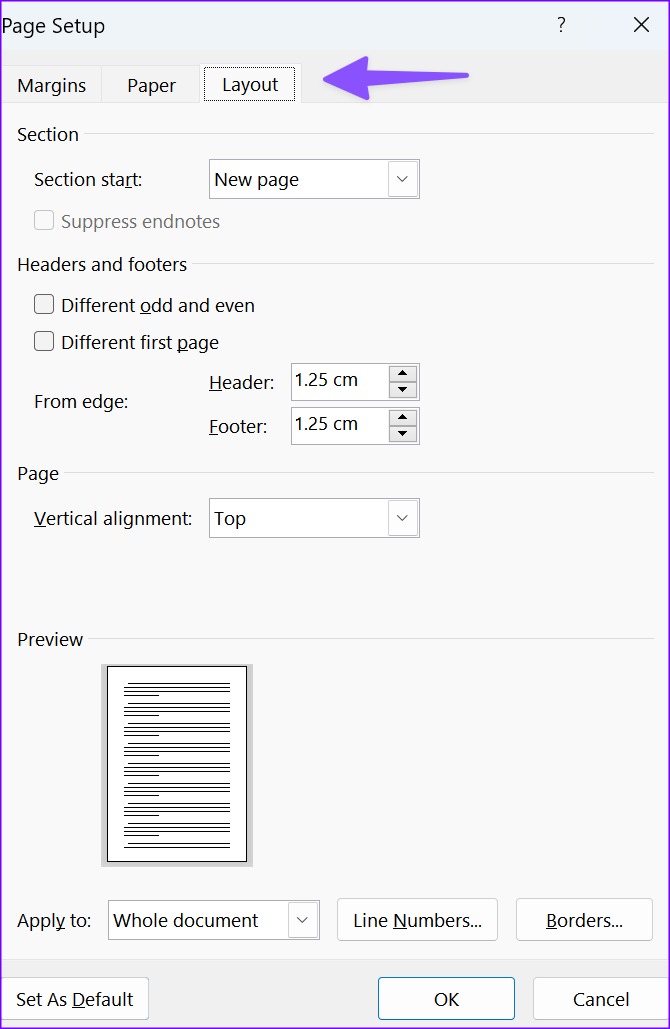
Step 3: Tweak margins for header and footer from the edge, check vertical alignment, add line numbers and borders, and click OK.
Make sure to check the live preview before you set your Word document as default.
Try Column Layout
Are you writing a Word document for a magazine or newspaper? Try the column layout for better readability to end users. Here’s what you need to do.
Step 1: Head to the Layout menu in Microsoft Word (refer to the steps above).
Step 2: Expand the Columns menu.
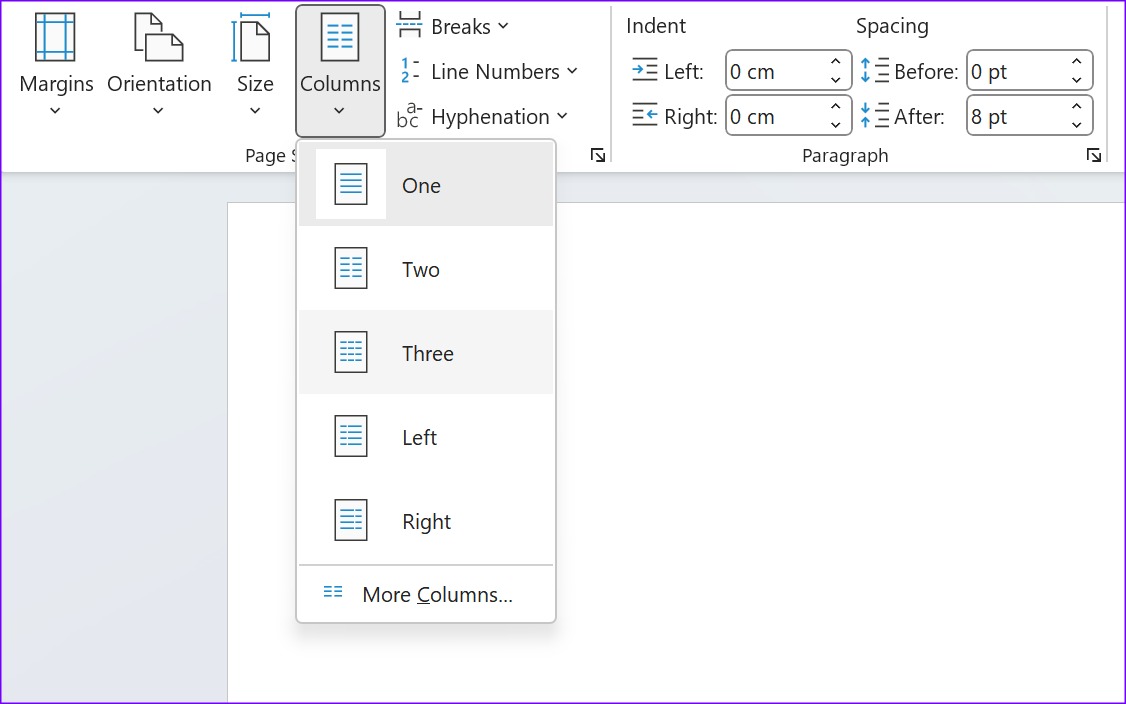
Step 3: Select one of the default column styles or make custom changes from the ‘More columns’ menu.
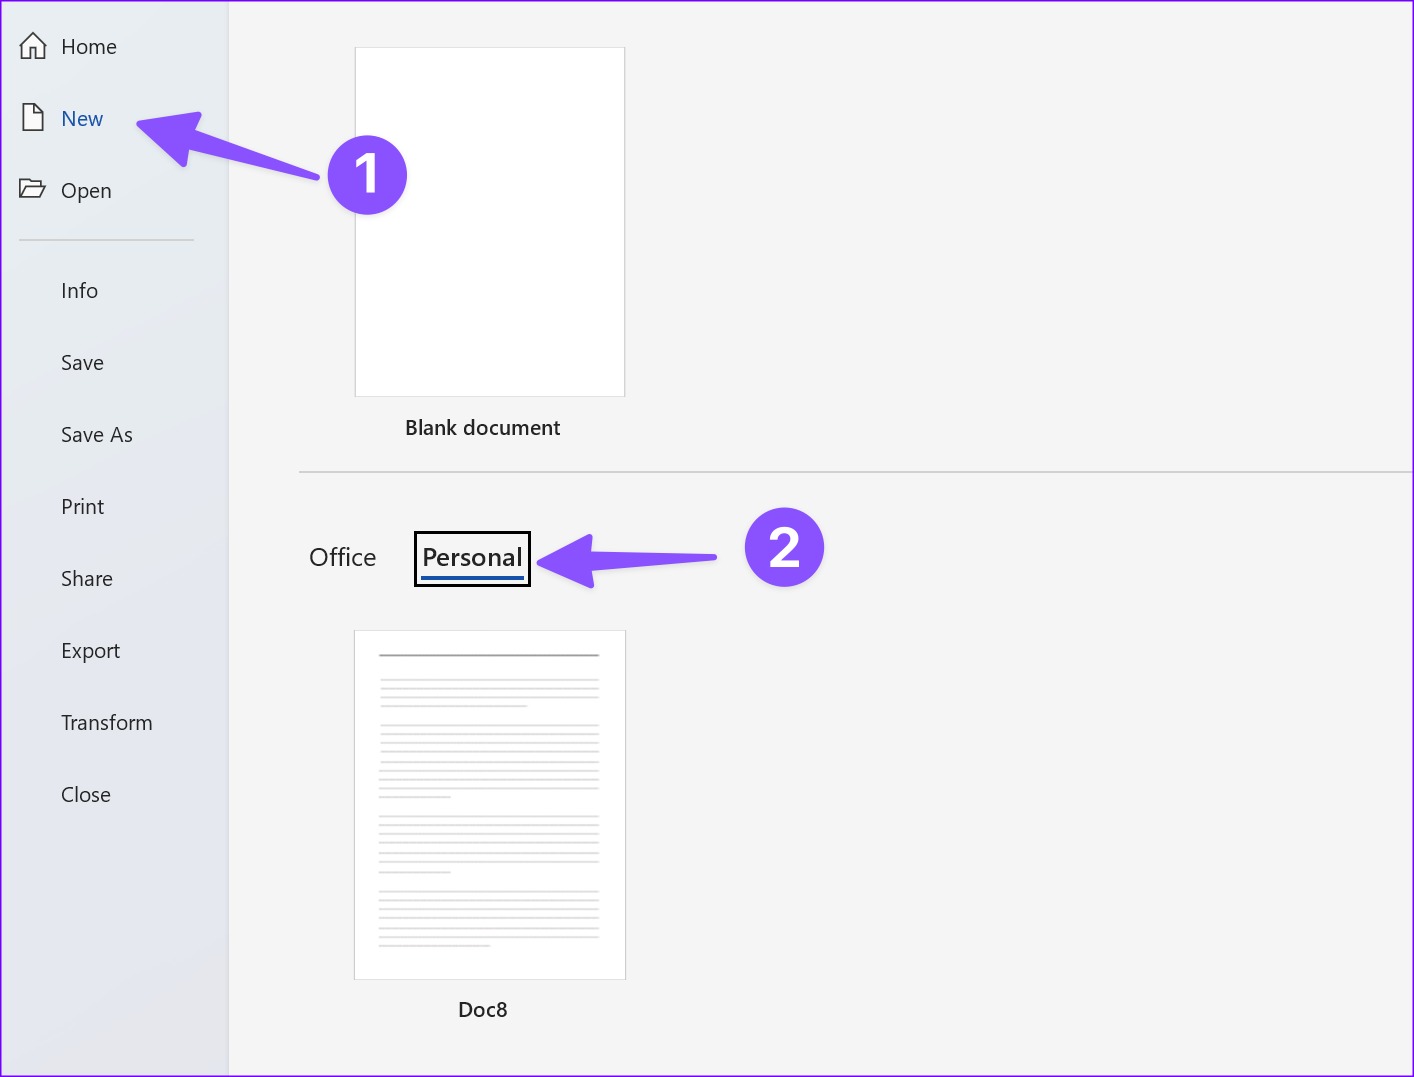
Save a Page Layout as a Template
After you make all the relevant changes to your page layout, you can save it as a template with a specific name and reason.
Step 1: Open a blank document and make all the changes to the page layout.
Step 2: Hit ‘File’ in the top left corner.
Step 3: Select ‘Save As.’

Step 4: Click ‘Browse.’

Step 5: Expand the ‘Save As Type’ dialog box and select Word Template.

Step 6: Name it and hit the ‘Save’ button.
You can find your Word template from the New menu and then click on Personal menu while creating a new document.
Customize Your Word Experience
Microsoft Word offers dozens of customization options to tweak the document’s look. How do you plan to set up your page layout? Share your preference in the comments below.
Last updated on 14 November, 2022
The above article may contain affiliate links which help support Guiding Tech. However, it does not affect our editorial integrity. The content remains unbiased and authentic.
Read Next
 How to Reset Home Screen Layout on iPhone to Default
Is your iPhone’s Home Screen messed up?
How to Reset Home Screen Layout on iPhone to Default
Is your iPhone’s Home Screen messed up?
 How to Download and Change Default Fonts in Microsoft Word
Microsoft Office Suite is the world’s most popular productivity suite.
How to Download and Change Default Fonts in Microsoft Word
Microsoft Office Suite is the world’s most popular productivity suite.
 How to Change the Page Orientation in Microsoft Word
When you launch the Microsoft Word app, the page appears in portrait mode by default.
How to Change the Page Orientation in Microsoft Word
When you launch the Microsoft Word app, the page appears in portrait mode by default.
 How to Change Default Browser, Make Firefox or Chrome Default
So the other day I downloaded and installed the latest version of Opera.
How to Change Default Browser, Make Firefox or Chrome Default
So the other day I downloaded and installed the latest version of Opera.
 Change Icons and Folders Appearance, Layout on Mac Desktop
We’ve all seen a classic Mac desktop: The outer-space or mountain-like background filled with medium-sized blue folders.
Change Icons and Folders Appearance, Layout on Mac Desktop
We’ve all seen a classic Mac desktop: The outer-space or mountain-like background filled with medium-sized blue folders.
 How to Change Background and Layout on Google Slides
With its nifty features, Google Slides is quickly becoming the leading choice to make and manage presentations.
How to Change Background and Layout on Google Slides
With its nifty features, Google Slides is quickly becoming the leading choice to make and manage presentations.
 How to Add Page Numbers in Microsoft Word
Microsoft Word is the preferred choice for many, especially those subscribed to the Microsoft 365 ecosystem.
How to Add Page Numbers in Microsoft Word
Microsoft Word is the preferred choice for many, especially those subscribed to the Microsoft 365 ecosystem.
DID YOU KNOW
Notion was founded by Ivan Zhao.

