If you used previous versions of Windows, i.e. XP and Vista, then you might know that preparing system repair disc is not a straight-forward task on those versions. On the contrary, Windows 7 provides an easy, quick and hassle-free way to create a system recovery disc.
This disc will contain Windows system recovery tools and it can be used for multiple purposes. You can boot your computer using this disc and also restore your computer to a previous state when needed.
How to create system repair disc in Windows 7
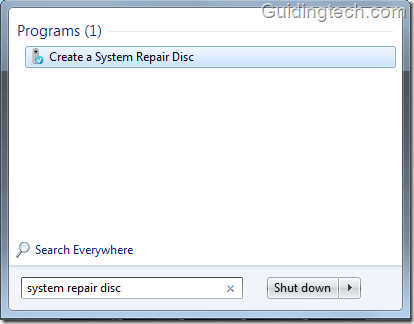
To create a system repair disc, click on start button. Type Create a system Repair Disc. Press Enter (even typing repair would do).
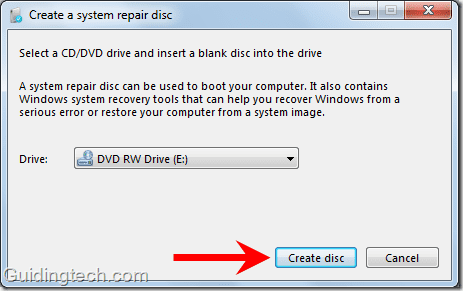
Select the drive from the drop down menu. Click on “Create disc” button.
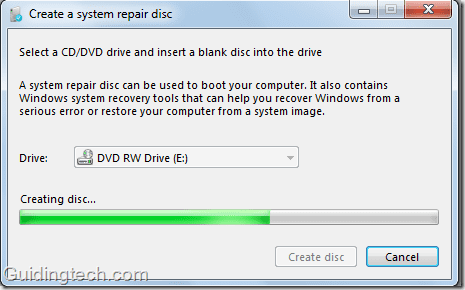
Windows will start preparing files to create a disc.

After few seconds, Windows starts creating your disc. It will take some more seconds to prepare a disc.
After system repair disc preparation process is completed, remove the disc and keep it at safe place so that you can use it in future whenever you need it.
How to repair your computer using system recovery disc
Go to BIOS settings. Set CD/DVD as the first boot device. Insert the system repair disc. Boot your computer. You’ll get system recovery options. These are the recovery tools:
- Startup Repair
- System Restore
- System Image Recovery
- Windows Memory Diagnostic
- Command Prompt
Select any one of the above given options and proceed with the further steps.
Last updated on 02 February, 2022
The above article may contain affiliate links which help support Guiding Tech. However, it does not affect our editorial integrity. The content remains unbiased and authentic.
Read Next
 6 Reasons to Use Repairit to Repair Damaged Video and Photos
We capture photos or record videos on our cameras and smartphones almost every day.
6 Reasons to Use Repairit to Repair Damaged Video and Photos
We capture photos or record videos on our cameras and smartphones almost every day.
 Use Check Disk (chkdsk) in Windows to Check for Hard Disk Errors
Windows comes with a decent set of tools which indeed help you optimize the performance and efficiency of your machine.
Use Check Disk (chkdsk) in Windows to Check for Hard Disk Errors
Windows comes with a decent set of tools which indeed help you optimize the performance and efficiency of your machine.
 How to Hide Files in Invisible Hard Disk Partition Using Secret Disk
If you’ve got members in the family or colleagues in the office who have a habit of taking a peek into your files and folders whenever they are using your
How to Hide Files in Invisible Hard Disk Partition Using Secret Disk
If you’ve got members in the family or colleagues in the office who have a habit of taking a peek into your files and folders whenever they are using your
 How to Create a Custom Recovery Image of Windows 8.1
Windows 8’s Refresh your PC feature is very useful in times when Windows is not working properly or not booting at all.
How to Create a Custom Recovery Image of Windows 8.1
Windows 8’s Refresh your PC feature is very useful in times when Windows is not working properly or not booting at all.
 How to Create a Recovery Drive in Windows 10
Imagine a situation when you wake up one fine morning only to realize that your computer just won’t boot.
How to Create a Recovery Drive in Windows 10
Imagine a situation when you wake up one fine morning only to realize that your computer just won’t boot.
 How to Create and Use a Recovery Drive on Windows 11
Microsoft bundles multiple recovery features with Windows to help users avoid completely wiping their system.
How to Create and Use a Recovery Drive on Windows 11
Microsoft bundles multiple recovery features with Windows to help users avoid completely wiping their system.
 Top 7 Ways to Fix ‘We Can’t Create a Recovery Drive’ Error in Windows 11
Windows operating system has built-in recovery features like System Restore, Windows Reset, and more.
Top 7 Ways to Fix ‘We Can’t Create a Recovery Drive’ Error in Windows 11
Windows operating system has built-in recovery features like System Restore, Windows Reset, and more.
DID YOU KNOW
Microsoft holds over 59,000 US and international patents.
