While working in a professional environment, the Pages app on the Mac lets you create newsletters, circulars, contracts, official announcements, and other confidential documents. The Pages app also allows you to change the background color to customize the document and add a signature for authenticity.
Also, when making documents meant for the company’s internal usage, you might want to add a watermark so that people understand the document’s confidentiality. This post will show you the steps to add a watermark in the Pages app on iPhone, iPad, and Mac.
Add a Watermark in Pages App on Mac
Creating documents in the Pages app on the Mac is quite convenient and including a watermark to your document adds a certain level of credibility. It also creates a disclaimer for the person accessing those documents about the confidential nature of the information.
Before beginning with the steps, please ensure that you are using the latest version of the Pages app.
Follow these steps to add a watermark.
Step 1: Press Command + Spacebar to open Spotlight Search, type Pages, and press Return
Step 2: Open the Document file where you want to add a Watermark.
Step 3: Click at the beginning of your document to reveal the cursor. Then press the Spacebar a couple of times to create empty space.
Step 4: Click on Text to Add a Text Box in the empty space at the top.
Step 5: Write your text for the watermark.
Step 6: Click on the Style tab in the right corner and look for Opacity at the bottom.
Step 7: Drag the slider to adjust opacity for the Watermark text.
Step 8: Click the Text tab on the right side.
Step 9: From the Text tab, you can choose the font type, size, color, and even the text’s Alignment.
Step 10: Keep the text box selected and then click on Arrange in the top menu bar.
Step 11: Click on Selection Layouts.
Step 12: Select Move Object to Selection Layout.
You will now see that the Watermark text has moved behind the regular text of your document. You can select and drag it towards the center of your page.
Follow these steps if you want to change the angle of the Watermark text.
Step 1: Click on Arrange at the extreme right corner.
Step 2: Under the Arrange tab, look for Rotate.
Step 3: Click and drag the circular icon to rotate the text.
You have successfully added a Watermark that will now appear on every page of your document.
Step 4: Press Command + S to save changes.
Add a Watermark in Pages App on iPhone and iPad
You can use the Pages app on your iPhone and iPad to add a watermark in your document. It’s helpful to make last minute changes before sending your documents. Just like your Mac, ensure that you are using the latest version of the Pages app on your iPhone and iPad.
Follow these steps and they apply to iPad as well.
Step 1: Open the Pages app on your iPhone or iPad. Open the document in which you want to add a watermark or create a new one.
Step 2: Tap the empty space at the top of the first page to reveal the cursor.
If you are not using a blank page, tap Return to add more empty space.
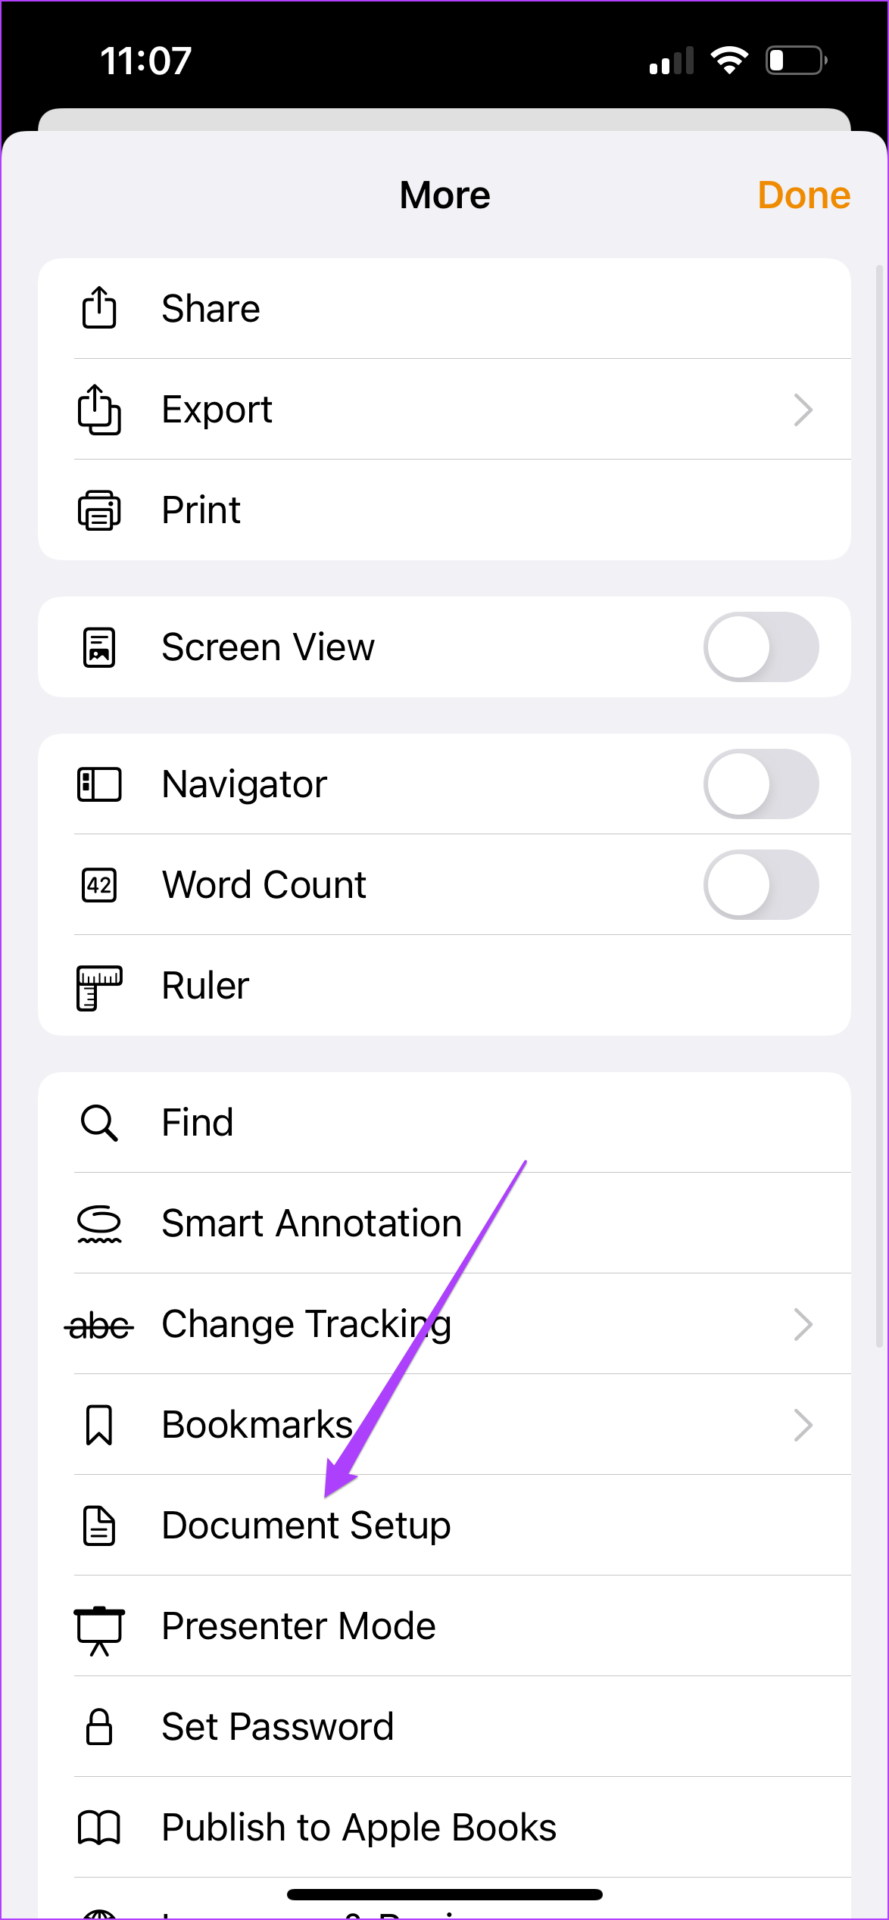
Step 3: Tap the three dots in the top-right corner.
Step 4: Select Document Setup from the list of options.
Step 5: On the Document Setup tab, scroll down to check if Headers and Footers options are enabled.
Step 6: Scroll down again and tap on More Options.
A new window will appear on your screen.
Step 7: Tap on the Plus sign at the top menu bar.
Step 8: Tap on Shapes icon.
Step 9: Tap on Text under the Basic tab.
Step 10: Add the text that you want as the watermark.
Step 11: Select the text box and tap the brush icon at the top.
Step 12: On the Style tab, scroll down and look for Opacity.
Step 13: Change the opacity as per your choice by dragging the slider.
Step 14: Select the Text tab and scroll down to change Text Size and Alignment.
Step 15: After this select the Arrange tab. Then scroll down and tap on Rotate.
Step 16: Tap the edges of the clock to select the angle of rotation for your watermark.
Step 17: Tap the Cross icon to close this window.
Step 18: Tap on Done to save changes.
The watermark will now appear on every page of your document.
Add Watermark in Pages App
This is how you can add a watermark to your documents using the Pages app on Mac. This feature can even help creative professionals like Film Directors and Scriptwriters while preparing their scripts. Adding a watermark can define the confidentiality of the documents and signifies that it is for reference purposes only.
Last updated on 20 May, 2022
The above article may contain affiliate links which help support Guiding Tech. However, it does not affect our editorial integrity. The content remains unbiased and authentic.


