Windows 10 comes with a screen recording tool built-in. It’s another one of those things that Microsoft isn’t really advertising or promoting. It’s pretty well hidden. Officially, it’s a Game DVR, for recording gameplay. But it records video from the window you point it to, along with the sound, so that means you can use it to record almost any kind of activity on your PC.

This might just be the easiest ways to record walk-through, lessons or bug reports.
But before you get too excited, you should know that this tool is not for pros. Or even power users. There are no individual controls for sound and video, you can’t even specify the basic settings for capturing video. If you want control, you’ll be better off with apps like Camtasia. All this is, is a built-in tool to use when you don’t really want to/can’t use a third-party software.
Let’s see how it’s done.
How to Use Game DVR in Windows 10
As I said above, the option is well hidden. You bring it up by pressing the keyboard shortcut Windows+G. When you bring it up after selecting a window that’s not a game, it will act suspiciously. You’ll need to check the box that says “Yes, this is a game” to be able to go forward.
Then you’ll see the Game DVR bar. This is a floating bar you can move wherever you want.

The most obvious part of the equation is the big red record button. Click it and the app will start recording the foreground window.
Note: It won’t record the entire screen. Only the app. So if you want to record a game, you better run in windowed mode instead of full screen.
While the app is recording, you’ll see a timer floating in the top-right. The game bar will disappear. Use the keyboard shortcut Windows+G to bring it up again and click the Record button to stop the recording.
You can also take a screenshot while recording by using the Windows+Alt+PrtScr keyboard shortcut.
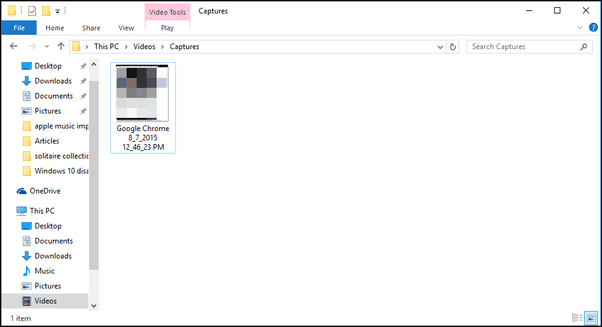
Once you stop the recording, the app will generate the video automatically and save it in This PC -> Video -> Captures.
Get started with Windows 10: Windows 10 has lots of cool new stuff. Start by customizing the Start screen, learning about the new window management features and learn to integrate Cortana in your day-to-day life.
Customizing Settings
From the floating bar, click the Gear icon to get into the settings.

From here you can increase the time for recording from the default 1 hour as well as enable recording in the background.
For more settings, click the go to the Xbox app to see more settings button.
To access the Xbox app, you’ll need an active internet connection.
The Xbox app will give you the same settings as the floating bar and more.
From here you can customize the keyboard shortcuts for opening Game bar, recording and taking a screenshot.
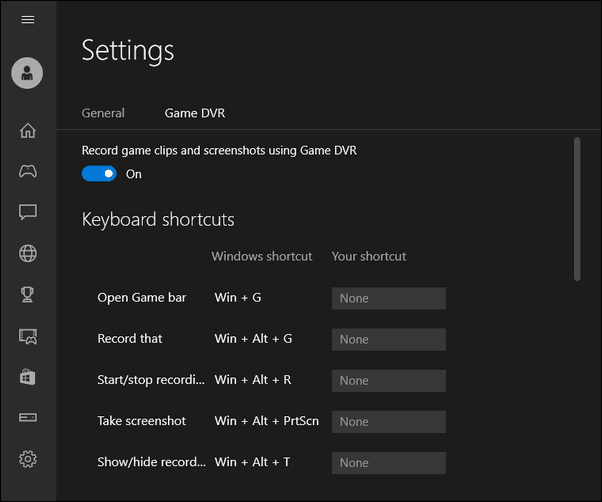
If you scroll down, you can even specify the video quality, audio quality and also disable audio recording.

What Will You Use It For?
What do you plan to use the built-in video recording tool for? Share with us in our forums section.
Last updated on 02 February, 2022
The above article may contain affiliate links which help support Guiding Tech. However, it does not affect our editorial integrity. The content remains unbiased and authentic.
Read Next
 AZ Screen Recorder vs DU Screen Recorder: A Detailed Comparison
We have come a long way since the launch of Android.
AZ Screen Recorder vs DU Screen Recorder: A Detailed Comparison
We have come a long way since the launch of Android.
 How to Record Audio or Sounds with Free Sound Recorder for Windows
Remember the old visuals of reporters on the beat holding up handheld audio recorders to catch some sound bytes?
How to Record Audio or Sounds with Free Sound Recorder for Windows
Remember the old visuals of reporters on the beat holding up handheld audio recorders to catch some sound bytes?
 7 Best Screen Recorder Apps for Windows 10
There can be many reasons behind why you would want to record the screen on your Windows 10 computer.
7 Best Screen Recorder Apps for Windows 10
There can be many reasons behind why you would want to record the screen on your Windows 10 computer.
 IORAD is a Web Based Screen Recorder to Create Tutorials
Explaining someone, who’s not computer savvy, how a software or a feature in the computer works isn’t easy.
IORAD is a Web Based Screen Recorder to Create Tutorials
Explaining someone, who’s not computer savvy, how a software or a feature in the computer works isn’t easy.
 Top 5 Fixes for Android 11 Screen Recorder Not Showing Up
Among several new Android 11 features, the native ability to record screen is one of the most exciting ones.
Top 5 Fixes for Android 11 Screen Recorder Not Showing Up
Among several new Android 11 features, the native ability to record screen is one of the most exciting ones.
 How to Fix MIUI Screen Recorder Has No Sound Error
MIUI offers a polished UI and comes with many features built-in.
How to Fix MIUI Screen Recorder Has No Sound Error
MIUI offers a polished UI and comes with many features built-in.
 Top 7 Fixes for Android 11 Screen Recorder Not Working Issue
Android 11 introduced many new cool features like Screen Recording and Chat Bubbles.
Top 7 Fixes for Android 11 Screen Recorder Not Working Issue
Android 11 introduced many new cool features like Screen Recording and Chat Bubbles.
 7 Best Fixes for Screen Recorder Not Working on Mac
Apple provides a default Screen Recorder on Mac and iMac to capture the activities on the screen to create videos.
7 Best Fixes for Screen Recorder Not Working on Mac
Apple provides a default Screen Recorder on Mac and iMac to capture the activities on the screen to create videos.
DID YOU KNOW
Microsoft Edge was initially code-named Project Spartan.
