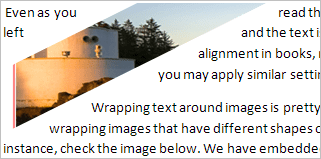
Even as you read this post you will see that we have an image on the left and the text is wrapped around it. We have all seen such image alignments in
, magazines, newspapers etc. Then there are ways to put text on an image too. You must have seen examples of those.
Wrapping text around images is pretty easy in MS Word. Something more interesting is wrapping images that have different shapes or maybe having that done across an image. For instance, check the image below. We have put text on an image completely and modified the wrapping alignment to make it look the way we want.

Today we will see how to do that. We will see how to wrap images and different shapes with text. We will learn to modify wrapping nodes in order to achieve this. Let us begin.
Steps to Apply Image Wrap and Edit Wrap Points
The process that we shall discuss has been tried on MS Word 2007 and the steps should be almost similar on other versions. I suggest that your try this as you read through.
Step 1: First and foremost you must have an image present in your document. If you don’t, insert one right away. You can modify the shape of your image by using Picture Tools if that is what you desire.

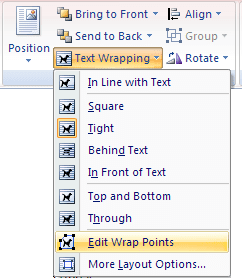
Step 2: In order to wrap text exactly to the shape of the image you need to navigate to Picture Tools -> Text Wrapping and select Tight. You may want to give a try to what others mean.

Here, if the image is rectangular, the wrapping would be rectangular as well. If it has a different shape, text will align itself to the design of the picture or shape.
Now, the point really is to move the text over and across the image. And selecting wrapping style as Behind Text won’t always help. Try it out.
Step 3: So we will stick to Tight and navigate to Text Wrapping again. This time out intention is to edit the wrap nodes. Thus, we will choose the option to Edit Wrap Points.
The moment you do this, red lines will appear around your image with square dots at the corners and some more points (if required).

Step 4: You may hold the line at any point and drag it to a desired location. The point you hold will reap a new node. Here’s what we did with our image. Note that the new boundary (red lines) becomes the wrapping shape.

Note: In case you want to remove an existing node simply hold the Ctrl key and click on that point.
Conclusion
A quick and easy way to play around with text on images don’t you think? I tried doing few cards, letters etc. The results were quite good. Try it out.
Image Credit: Pinguino
Last updated on 03 February, 2022
The above article may contain affiliate links which help support Guiding Tech. However, it does not affect our editorial integrity. The content remains unbiased and authentic.
Read Next
 Use Find & Replace To Insert Text String After Word In MS Word
The Find and Replace feature of Microsoft Word is a huge productivity booster because it allows us to do even massive text replacements with a single click.
Use Find & Replace To Insert Text String After Word In MS Word
The Find and Replace feature of Microsoft Word is a huge productivity booster because it allows us to do even massive text replacements with a single click.
 How to Put Image or Text On Top of Another Image in Google Docs
Apps like Microsoft Word, Google Slides, etc., let you overlap images or text over another image without any fuss.
How to Put Image or Text On Top of Another Image in Google Docs
Apps like Microsoft Word, Google Slides, etc., let you overlap images or text over another image without any fuss.
 How to Quickly Add Dummy Text To A Word Document [Quick Tip]
Most of us have heard of Lorem ipsum, which is frequently used as dummy text.
How to Quickly Add Dummy Text To A Word Document [Quick Tip]
Most of us have heard of Lorem ipsum, which is frequently used as dummy text.
 How to Convert Text to Table (and Vice-Versa) in MS Word
Formatting a document in MS Word can get really difficult yet extremely easy.
How to Convert Text to Table (and Vice-Versa) in MS Word
Formatting a document in MS Word can get really difficult yet extremely easy.
 How To Double Underline Text In Microsoft Word
There are lots of ways to emphasize a piece of text in MS Word.
How To Double Underline Text In Microsoft Word
There are lots of ways to emphasize a piece of text in MS Word.
 How to Make an Image Out of Text in Photoshop – Guiding Tech
I’ve always been interested in making new and unique designs using the tools that come with Photoshop.
How to Make an Image Out of Text in Photoshop – Guiding Tech
I’ve always been interested in making new and unique designs using the tools that come with Photoshop.
 How to Fill See-Through Text With Image in GIMP
There are many ways to make creative graphics.
How to Fill See-Through Text With Image in GIMP
There are many ways to make creative graphics.
DID YOU KNOW
Rhein II is one of the most expensive photographs in the world.