AirDrop is an integral part of the Apple ecosystem. With a single click, users can send large files from iPhone/iPad to Mac or vice versa. There is no need to use cables, cloud storage, or any third-party services such as Xender or Airdrop to send files and media. But what if things go south? Airdrop not working on Mac can leave you with a headache as you won’t want to deal with a lightning cable to get things done.

AirDrop uses Bluetooth 4.x for power-efficient broadcast and discovery, and peer-to-peer WiFi for speedy transfer. If you are having trouble transferring files using AirDrop from Mac then check the solutions to fix the issue.
1. Check Device Compatibility
To use AirDrop successfully, your Mac must be running OS X Yosemite or a later macOS version. You can find out which macOS version your Mac is running by going to the Apple menu > About This Mac. As for updates, go to the Apple menu > System Preferences > Software Update.
Also, the device you are trying to transfer files must be an AirDrop-compatible device.
While transferring files from Mac to iPhone, your iPhone needs to be an iPhone 5 or later version, running iOS 7 or later versions of iOS software.
If you are trying to AirDrop from Mac to iPad or iPod, the iPad must be iPad 4 or later, and iPod needs to be 5th generation or newer.
2. Adjust AirDrop Settings on iPhone
Apple offers a couple of sharing options to use the AirDrop function across devices securely. You need to check on your iPhone to make sure that the device can receive files through AirDrop from Everyone or Contacts. Follow the steps below to make the changes.
Step 1: Open the Settings app on the iPhone.
Step 2: Navigate to General > AirDrop.
Step 3: Select Contacts Only or Everyone from the following menu.


Alternatively, you can swipe down from the upper right corner (Or the bottom of the iPhone if you are using an older model with a power button) and open the Control Centre.
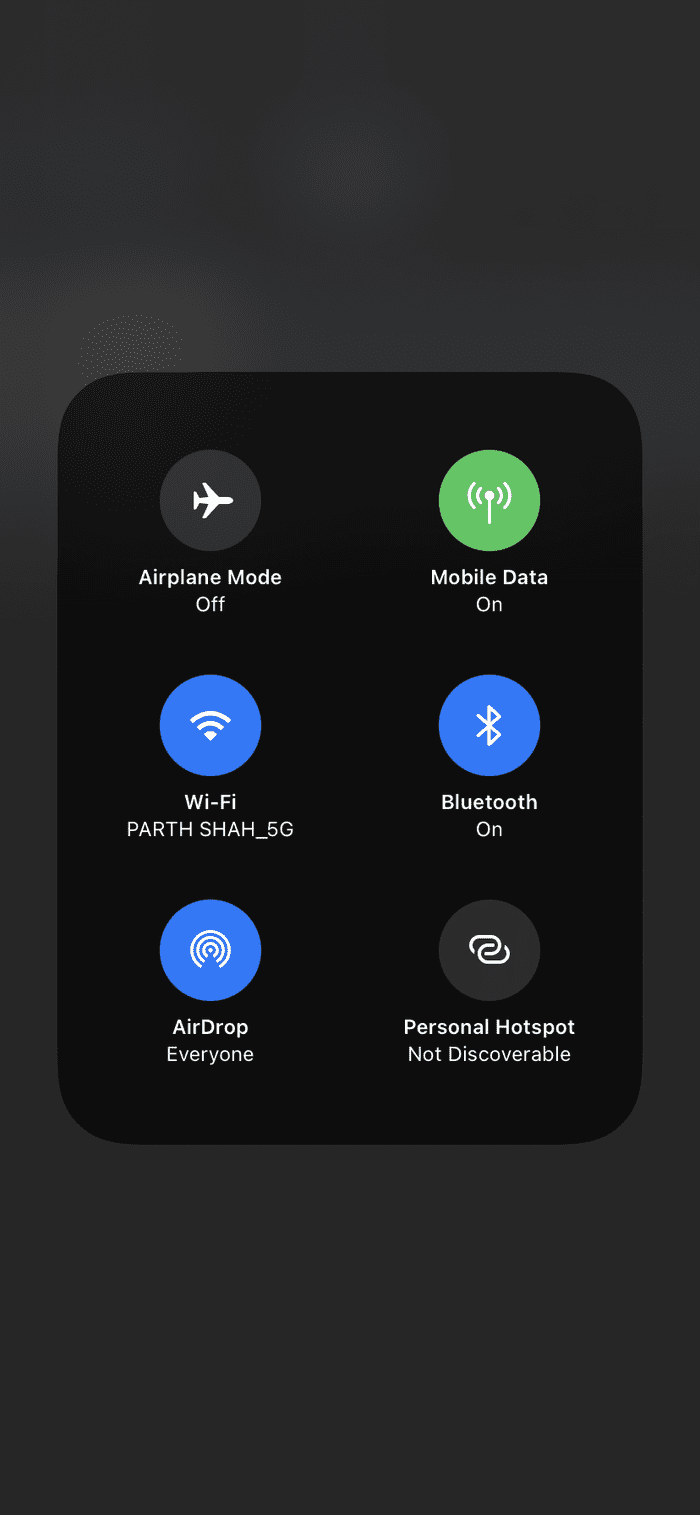
Long-press on the connectivity menu and enable the AirDrop option.
3. Check WiFi and Bluetooth
AirDrop relies on Bluetooth to find nearby devices and WiFi to transfer files effortlessly. Hence, make sure Bluetooth and WiFi are enabled on the sending Mac device.
Go to the Mac menu bar and click on the Bluetooth icon to enable the service. Similarly, follow the same routine for WiFi as well.

You can also open the Finder menu > AirDrop and it will showcase which connections are disabled on the Mac. You can enable them from the said menu as well.

The receiving device needs to have at least Bluetooth enabled. Also, you just need to make sure that the AirDrop toggle is on for the device with relevant permission.
4. Allow AirDrop Everyone From Mac
You can be perfectly fine with the Contacts Only AirDrop option on the Mac. But sometimes, it might lead to failure in sending files from Mac to an iPhone.
Hence, follow the steps below to switch the Sharing permission to Everyone in the AirDrop menu.
Step 1: Open the Finder menu on the Mac.
Step 2: Click on AirDrop in the left-pane. In the right pane, click on Allow me to be discovered by and select Everyone in the drop-down menu.
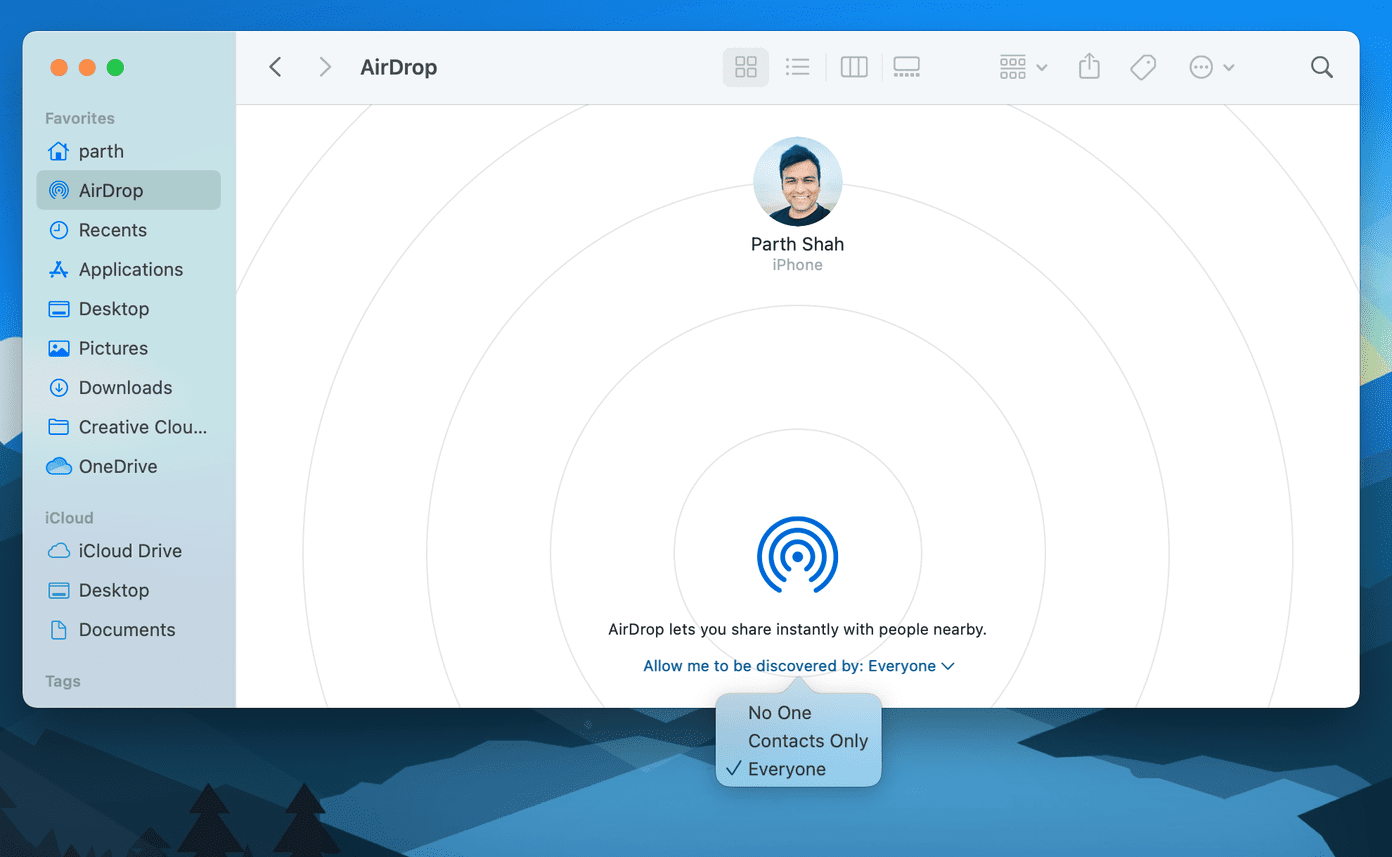
Once again, let me remind you to enable Allow Everyone option on the device that you are transferring files to.
5. Sign Into iCloud on Both Devices
For security reasons, we recommend using the Contacts Only option on AirDrop on both the Mac and iPhone. For that, make sure both sending and receiving devices are signed in to iCloud.
The iCloud-associated email ID or mobile number must also be available in the contacts list on both devices.
6. Disable Do Not Disturb Mode on Mac
If the Do Not Disturb mode is enabled on your Mac, you won’t be able to send files using the AirDrop functionality.
Hover the mouse pointer to the macOS menu bar and open Control Centre. Disable DND mode from the drop-down menu.

Alternatively, you can disable DND from the System Preferences > Notifications menu.
Similarly, make sure that the device to which you are transferring files is not placed in Do Not Disturb Mode.
7. Prevent Mac from Going to Sleep
Transferring huge files over AirDrop does take time. AirDrop can fail if your Mac goes to sleep during the file transfer process. Follow the steps below to change the behavior.
Step 1: Open the System Preferences menu on the Mac.
Step 2: Go to Battery > Power Adapter menu.
Step 3: Enable the ‘Prevent computer from sleeping automatically when the display is off’ option.

Start Sharing Files Over AirDrop
Transferring files using AirDrop to your different Apple devices is part of what makes using the Mac and iPhone/iPad combo so painless. Go through the steps above and fix any AirDrop-related issues on the Mac. Do share which trick worked for you in the comments below.
Next up: Are you facing a screen flickering issue on MacBook? Read the post below to learn how to fix the issue.
Last updated on 13 July, 2021
The above article may contain affiliate links which help support Guiding Tech. However, it does not affect our editorial integrity. The content remains unbiased and authentic.
Read Next
 Top 10 Ways to Fix AirDrop Not Working on iPhone
AirDrop is easily one of the most underrated features of the iPhone.
Top 10 Ways to Fix AirDrop Not Working on iPhone
AirDrop is easily one of the most underrated features of the iPhone.
 Top 8 Ways to Fix MacBook Not Showing on AirDrop
AirDrop remains one of the best ways to transfer large files from iPhone or iPad to Mac and vice versa.
Top 8 Ways to Fix MacBook Not Showing on AirDrop
AirDrop remains one of the best ways to transfer large files from iPhone or iPad to Mac and vice versa.
 7 Best Fixes for AirDrop Not Sending Files From iPhone to Mac Issues
AirDrop is one of the best ways to share files between devices in the Apple (iOS and macOS) ecosystem.
7 Best Fixes for AirDrop Not Sending Files From iPhone to Mac Issues
AirDrop is one of the best ways to share files between devices in the Apple (iOS and macOS) ecosystem.
 How to Change Your AirDrop Name on iPhone, iPad, and Mac
AirDrop is an extremely convenient feature to transfer files between your Apple devices.
How to Change Your AirDrop Name on iPhone, iPad, and Mac
AirDrop is an extremely convenient feature to transfer files between your Apple devices.
 6 Best Fixes for AirDrop Stuck on Waiting on iPhone, iPad, and Mac
AirDrop is probably one of the reasons why you switch to an Apple ecosystem.
6 Best Fixes for AirDrop Stuck on Waiting on iPhone, iPad, and Mac
AirDrop is probably one of the reasons why you switch to an Apple ecosystem.
 Using AirDrop to Exchange Files, Links Between iOS, Mac
AirDrop, the seemingly magical technology that allows you to send links, files, and media between iPhones, iPads, and Mac seems easy enough to understand on the surface.
Using AirDrop to Exchange Files, Links Between iOS, Mac
AirDrop, the seemingly magical technology that allows you to send links, files, and media between iPhones, iPads, and Mac seems easy enough to understand on the surface.
 How to Fix AirDrop Converting Videos on iPhone
Apple's AirDrop is one of the best ways to transfer large files from an iPhone to a Mac and vice versa.
How to Fix AirDrop Converting Videos on iPhone
Apple's AirDrop is one of the best ways to transfer large files from an iPhone to a Mac and vice versa.
 GT Answers: Differences Between AirDrop and AirPlay
Sharing information between devices wirelessly is something that is treasured these days.
GT Answers: Differences Between AirDrop and AirPlay
Sharing information between devices wirelessly is something that is treasured these days.
DID YOU KNOW
Up until September 14, 1995 domain registration was free.

