After Android manufacturers had it for years, Apple finally introduced Night Mode with the iPhone 11. Night Mode drastically improves the low-light performance when clicking pictures using your iPhone. However, there are a few tips and tricks using which you can use iPhone Night Mode even more effectively to click eye-catchy pictures for your Instagram.

So, grab your iPhone and get ready to impress all your friends with some excellent photos at night. Whether you’re clicking your friend, some nice Christmas lighting, or the stars in the sky, here’s how to use Night Mode on your iPhone in the most effective manner. But first things first.
Which iPhones Have Support for Night Mode
Unfortunately, not all iPhone models have Night Mode in the camera app. Here are all the iPhones that have support for Night Mode.
- iPhone 11
- iPhone 11 Pro
- iPhone 11 Pro Max
- iPhone 12
- iPhone 12 mini
- iPhone 12 Pro
- iPhone 12 Pro Max
- iPhone 13
- iPhone 13 mini
- iPhone 13 Pro
- iPhone 13 Pro Max
- iPhone 14
- iPhone 14 Plus
- iPhone 14 Pro
- iPhone 14 Pro Max
Note that the iPhone 11 series has Night Mode only on the primary camera. So, if you’re shooting at night, we suggest using the primary camera only. As a thumb rule, the primary is generally the best in terms of details, so we suggest using the primary 1X shooter on all iPhones even if the ultra-wide and telephoto lenses have support for Night Mode.
How to Turn On Night Mode on iPhone Manually
iPhone Camera automatically triggers Night Mode when it detects a dark scene. However, there may be instances where Night Mode hasn’t been triggered even if the lighting around you isn’t good. In such a scenario, you might end up with dark photos or encounter focusing issues on your iPhone.
Don’t worry, though, as you can manually enable Night Mode in such situations to capture more light in your shots. Here’s how to turn on Night Mode on your iPhone.
Step 1: Open the Camera app on your iPhone. Point to the subject you want to shoot.
Step 2: Swipe up on the middle of the screen to bring up additional toggles.

Step 3: Select the second icon from the left in the bottom bar. This will bring up the Night Mode slider.

Step 4: Drag the slider at the bottom to the left. You can now see at the top of the screen that Night Mode has been enabled. You can also see the duration for which the image will be captured.

Hit the shutter button now to click a photo. It will be clicked with Night Mode enabled.
How to Take Better Night Mode Photos on iPhone
Here are some ways in which you can improve your night photos (low-light images) and end up with stellar shots. You can use some or all of these tips when clicking photos at night depending on the scenario.
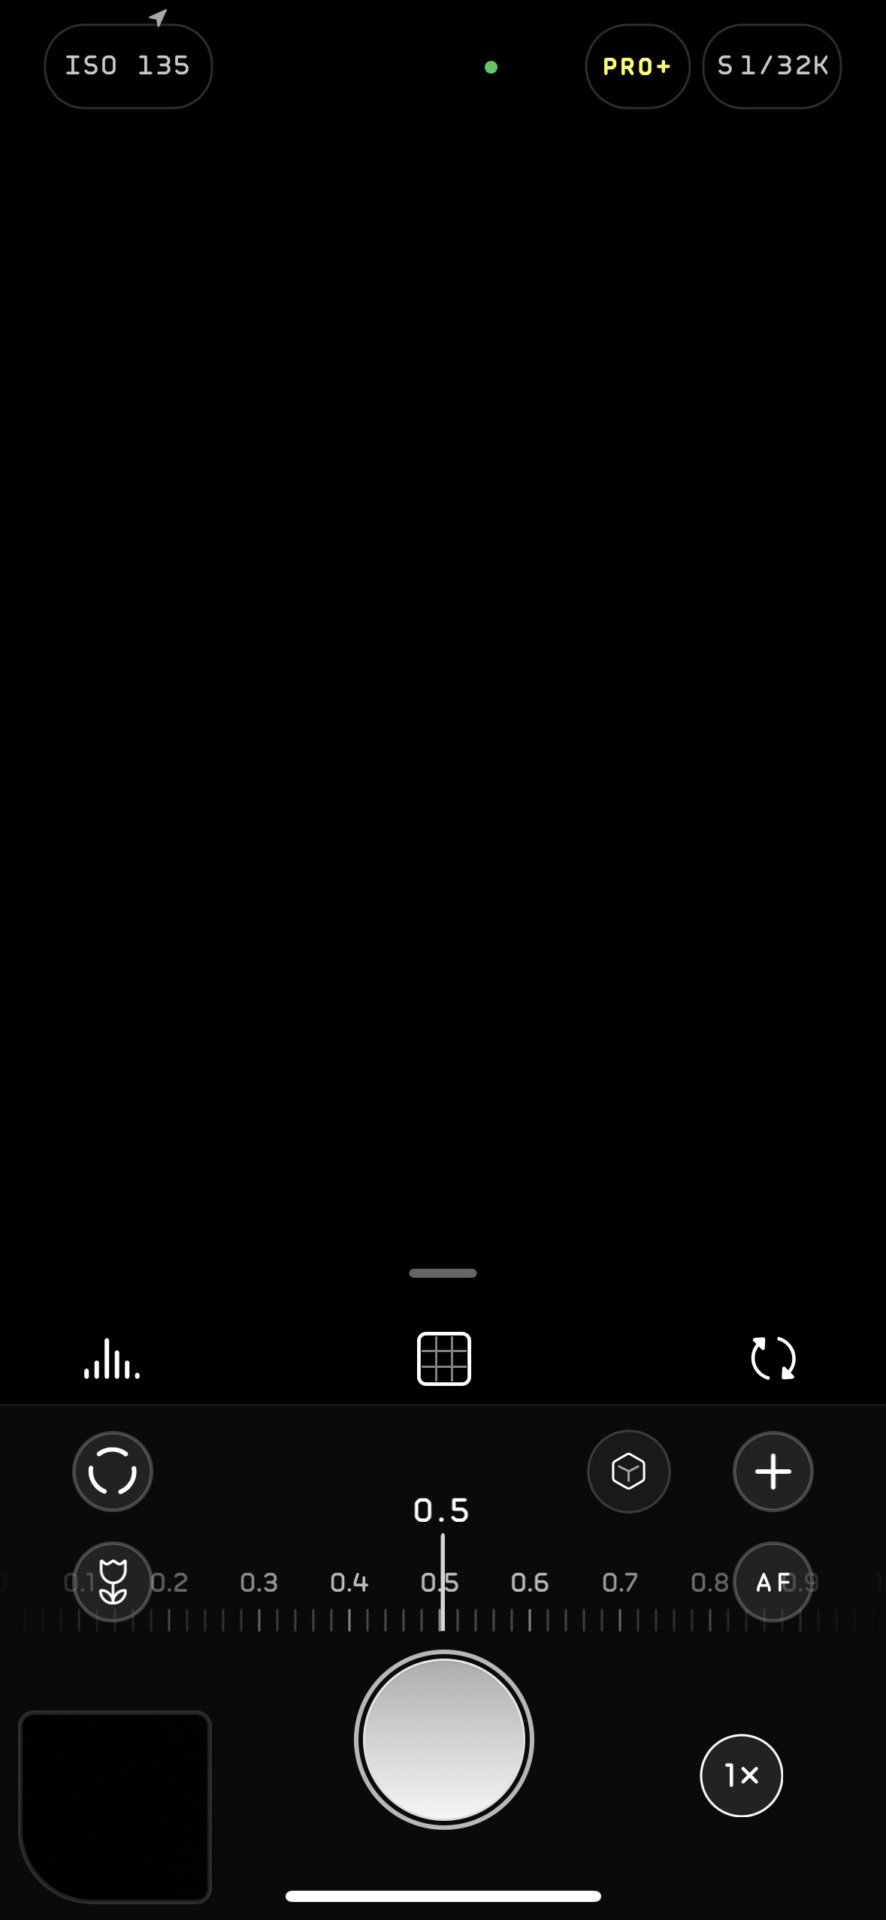
1. Increase Shutter Time
The iPhone keeps the camera’s shutter open for a few seconds to capture multiple shots at night. The longer the duration, the brighter and better your shots will turn out to be. So, if your iPhone is showing that it will capture a shot for one or two seconds, you can increase the time and get a better output. Here’s how to do it.
Step 1: Open the Camera app on your iPhone. Point to the subject you want to shoot.
Step 2: Swipe up on the middle of the screen to bring up additional toggles.

Step 3: Select the second icon from the left in the bottom bar. This will bring up the Night Mode slider.

Step 4: Vary the slider to increase the timer. If it shows one second by default, increase it to two or three.
Note: The maximum shutter speed might vary depending on your surrounding lights.

Hit the shutter button to capture the shot. It will turn out to be better than the one with the default timer.
2. Hold Your Phone Steady and Close to Your Body
When your iPhone is capturing multiple shots with a long shutter time, it’s extremely important to keep your phone stable. This ensures that all the shots captured can be overlayed perfectly to form a more detailed and brighter image.

A good way to keep your phone steady when holding it in your hand is to keep your hands close to your body. Try not to stretch your arms away from your body as it can cause some wobble. Also, hold your phone using both your hands instead of just one for extra stability.
3. Use a Tripod or Rest Your iPhone Against a Surface
This point is in continuation to the previous one. The iPhone’s Night Mode can capture a shot for 30 seconds at most. This is helpful when capturing heavenly bodies. But, if you’re wondering how to take night photos on iPhone for so long, the answer is to use a tripod.
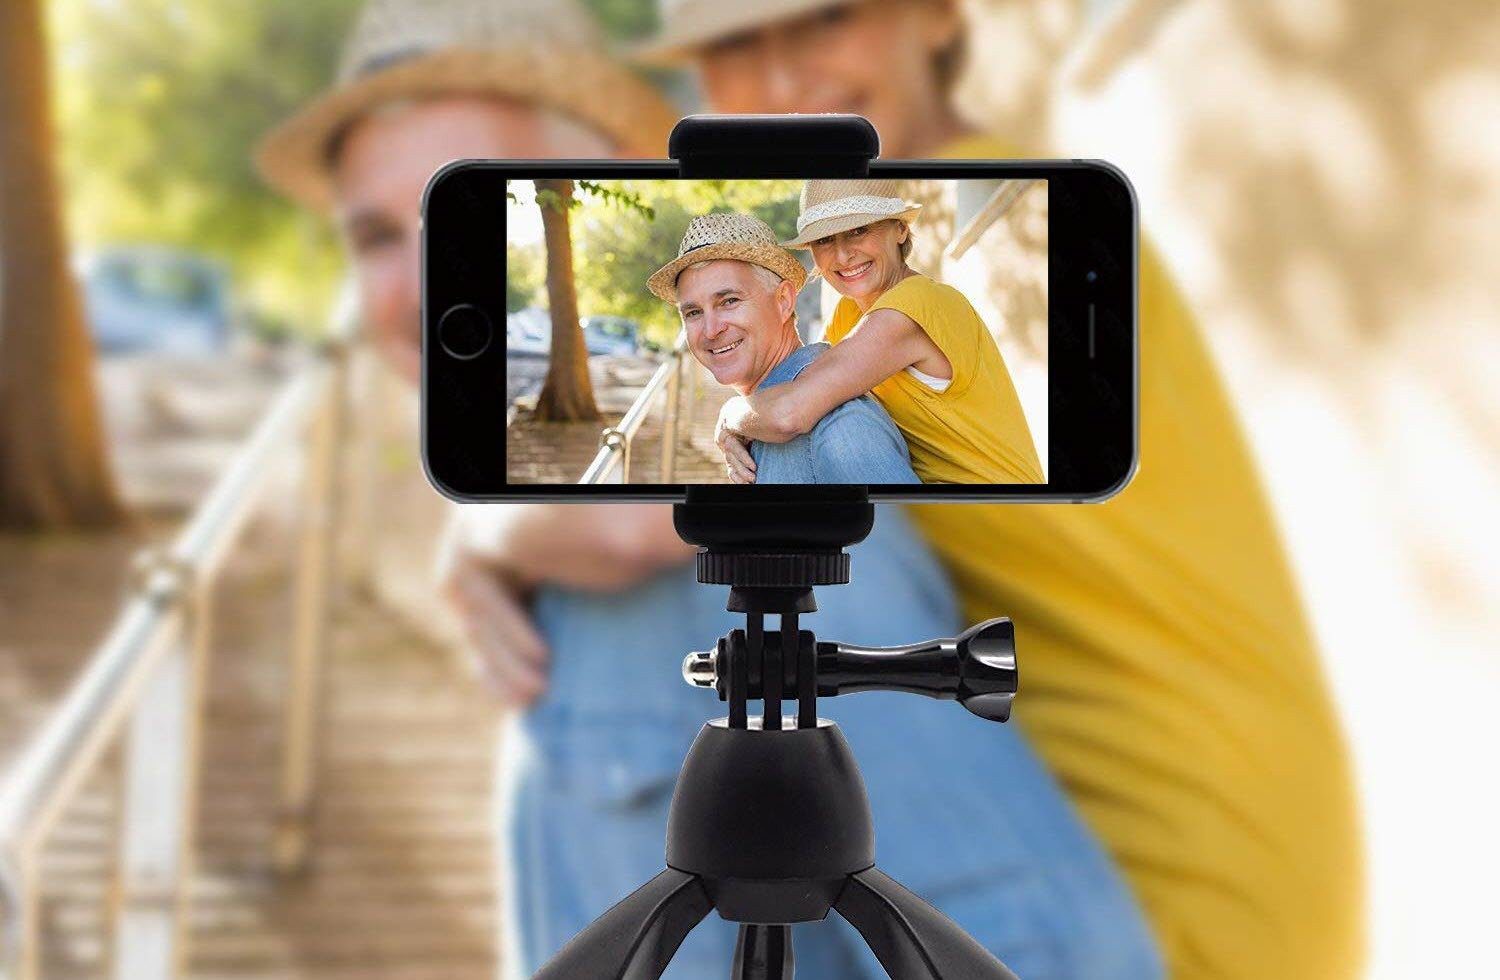
A tripod keeps your iPhone absolutely steady which is a necessity to avoid blurry shots at night. So, if you want to master night photography with your iPhone, a tripod is highly recommended.
Mount your iPhone on a tripod and point it in the direction of your shot. Then, manually increase the shutter time using the method above. If you’re clicking photos of the night sky, you can extend the timer up to 30 seconds.

In case you don’t have a tripod, you can also choose to rest your phone against a surface so that it stays still.
4. Do Not Zoom In or Out
As mentioned earlier, the primary camera is the best camera on your iPhone. But at times, you may want to zoom in to get a better perspective or zoom out to fit more elements in your frame. However, this isn’t advisable when you’re shooting at night.
The secondary and tertiary lenses on your iPhone aren’t that powerful and hence, might capture photos with fewer details and more noise. So, instead of zooming in or out to frame your picture, capture photos using the primary camera. You can then zoom into the photo while editing it to frame it as per your needs.

If you want to capture a wider frame, step back until you have the desired frame instead of switching to the ultrawide camera.
5. Disable the Camera Flash
You must be thinking that the flash adds more light to the scene and hence, helps with better photos at night. Well, that’s just partly true. A flash produces harsh lighting which is fine for close-up objects but if you’re clicking human subjects or anything that’s slightly farther from the camera, the flash can actually ruin your shot.
If your iPhone automatically turns on the flash in low-light conditions, hit the flash icon at the top-left corner of the app to disable it.

The moment it turns from yellow to transparent, you know that the flash has been disabled. Unless you’re clicking photos in pitch-dark conditions, we suggest keeping the flash off.
6. Use the Exposure Slider
Whenever you tap on your subject to focus within the iPhone Camera app, you will see a box along with a slider on the side. This is known as the exposure slider. You can use it to vary the exposure or brightness of your shot.
So, if you’re in a low-light situation and feel like your photo needs to be brighter, you can use the exposure slider before clicking the image. Here’s how it works.
Step 1: Open the Camera app on your iPhone. Point to the subject you want to shoot.
Step 2: Tap on your subject to focus on it. If you’re clicking a scenery or a faraway subject, tap on the center of the frame.

Step 3: Use the slider at the right of the focus box to vary the exposure levels. Drag the slider up to increase the exposure and drag it down to lower it.


Once you’re satisfied with the exposure level, hit the shutter button to capture the photo a night on your iPhone.
7. Use Third-Party Apps for Long Exposure Shots
There’s no denying that the default camera app on the iPhone is extremely limiting. You don’t get pro controls or modes to capture star trails, light trails, or long exposure shots in low-light situations. If you want those added features, we suggest taking a look at some of the best manual camera apps for your iPhone.

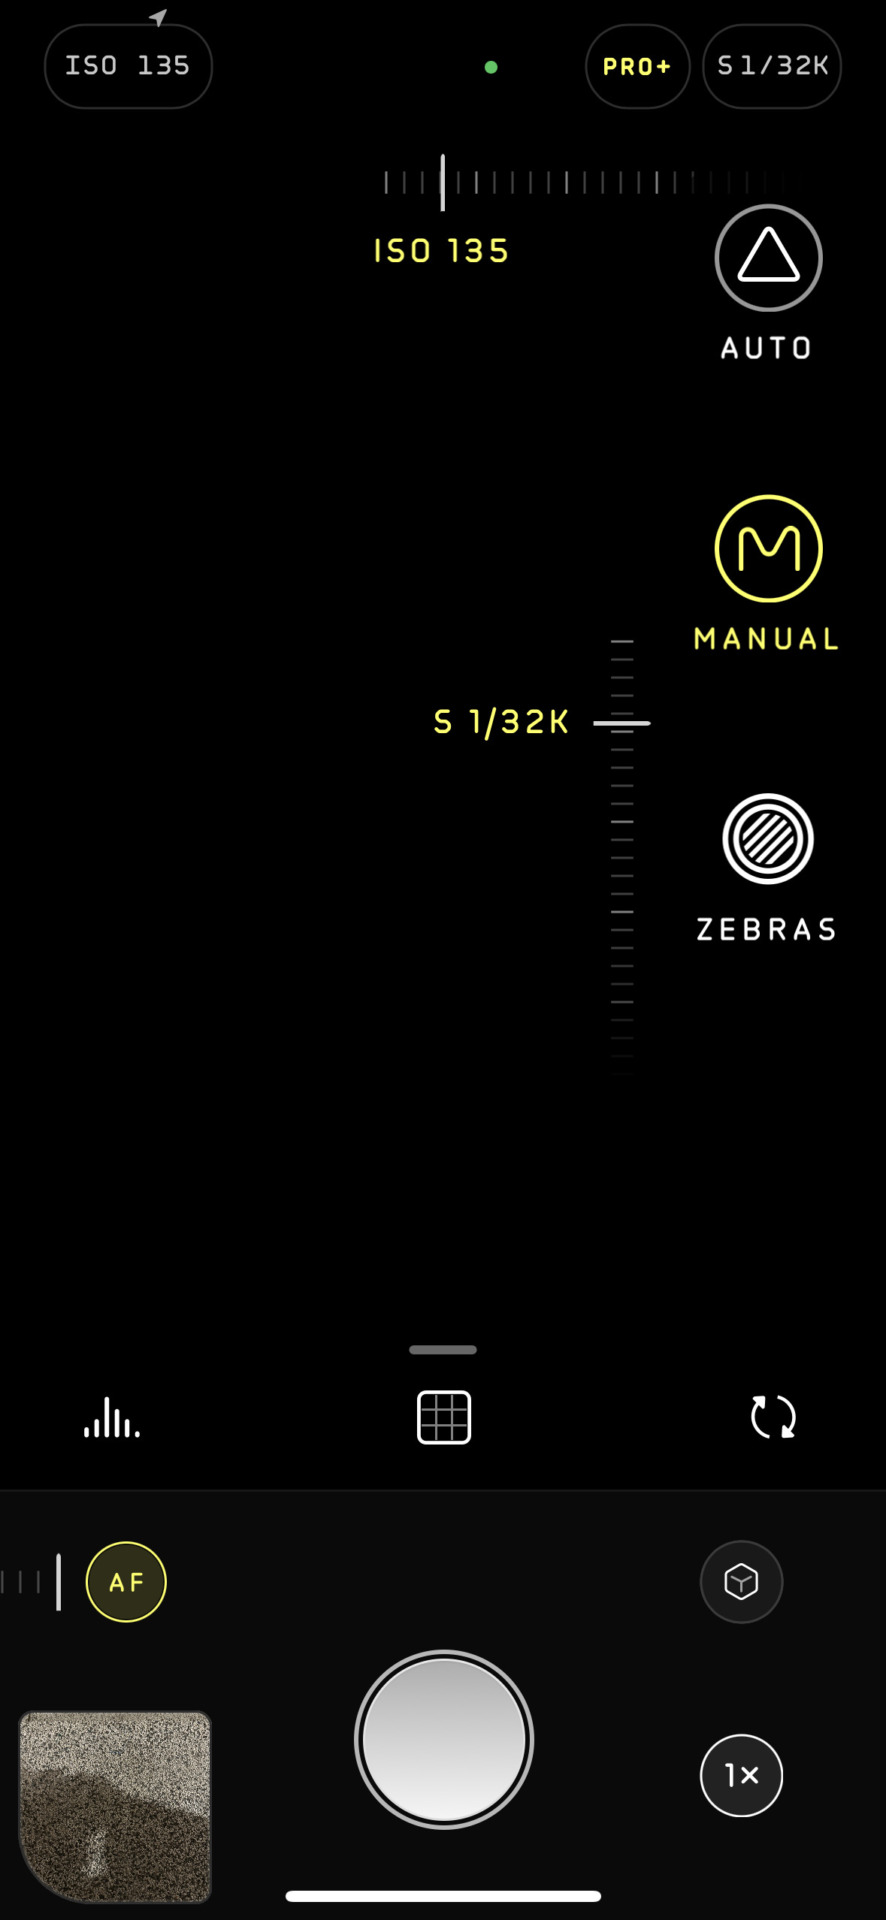
Since you get granular controls, you can manually set the ISO, shutter speed, white balance, and other parameters to capture a scene exactly the way you want to. If you’re serious about night photography with your iPhone, you should consider downloading one of the apps.
FAQs for Using Night Mode on iPhone
No, the default camera app on iOS does not have a manual mode. You will have to use a third-party app for manual controls.
Apple introduced Night Mode on the selfie camera too starting with the iPhone 12. So, if you have an iPhone 12 and above, you can take selfies in Night Mode as well.
Get hold of a tripod and mount your iPhone on it. Point the camera in the direction of the moon. Use the primary shooter (1x) and capture a 30-second image of the moon. Since the iPhone doesn’t have a large optical zoom lens like the Samsung Galaxy S23 Ultra, you cannot get close-up shots of the moon.
Capture Stunning Photos on Your iPhone
iPhone cameras have gotten extremely powerful in recent years. You can now click excellent photos right from your phone without the need for a dedicated camera. While low-light photography is still a challenge, using the iPhone Night Mode lets you take some great photos even in the dark.
Last updated on 04 May, 2023
The above article may contain affiliate links which help support Guiding Tech. However, it does not affect our editorial integrity. The content remains unbiased and authentic.
Read Next
 How to Enable Night Mode for Chrome on Android (and More Tips)
There are two types of people in this world.
How to Enable Night Mode for Chrome on Android (and More Tips)
There are two types of people in this world.
 Top 4 PDF Readers with Night Mode
After a long day of work or while late at night, our eyes do need some much-needed respite from the otherwise strong glare on our screens.
Top 4 PDF Readers with Night Mode
After a long day of work or while late at night, our eyes do need some much-needed respite from the otherwise strong glare on our screens.
 How to Add Night Vision Effect To Photos Using Photobucket
One of the important prerequisites that a photo must possess if you want to add cool effects to it later is, of course, light.
How to Add Night Vision Effect To Photos Using Photobucket
One of the important prerequisites that a photo must possess if you want to add cool effects to it later is, of course, light.
 5 Best Android Apps that Reduce Eye Strain for Night Reading
When Apple introduced Night Shift for iOS, lots of people started talking about blue light filters for Android.
5 Best Android Apps that Reduce Eye Strain for Night Reading
When Apple introduced Night Shift for iOS, lots of people started talking about blue light filters for Android.
 5 Best Night Vision Security Cameras
A security camera is only half as effective if it doesn't have proper night vision capabilities.
5 Best Night Vision Security Cameras
A security camera is only half as effective if it doesn't have proper night vision capabilities.
 Top 3 Windows 10 Night Light Alternatives
The Night Light functionality in the Windows 10 April Update last year was a welcome addition for those who hated the tremendous amount of blue light emitting from the monitor
Top 3 Windows 10 Night Light Alternatives
The Night Light functionality in the Windows 10 April Update last year was a welcome addition for those who hated the tremendous amount of blue light emitting from the monitor
 5 Best Speakers for Outdoor Projectors for a Perfect Movie Night
With so many affordable portable projectors available in the market, it's only fair to want a great movie night experience at home.
5 Best Speakers for Outdoor Projectors for a Perfect Movie Night
With so many affordable portable projectors available in the market, it's only fair to want a great movie night experience at home.
 6 Best Motion Sensor Night Lights in UK for 2023
Let us paint a picture for you — you wake up in the middle of the night to use the bathroom.
6 Best Motion Sensor Night Lights in UK for 2023
Let us paint a picture for you — you wake up in the middle of the night to use the bathroom.
DID YOU KNOW
The film which used in NASA’s Apollo 11 moon missions was manufactured by Kodak.